> iPhone Manager > How To >Sync Ringtone in Catalina

How to Sync Ringtone in Catalina macOS - No Tones Tab in Finder

Last Updated : July 12, 2019 By Joakim Kling

This post focuses on how to set custom ringtone on Catalina, the latest macOS 10.15 that replaces iTunes with Apple Music, TV, Podcasts and part of Finder's newly added iDevice management utility. If creating custom ringtones in iTunes is already a twisted task with many steps, where shall an iPhone ringtone lover start with all these separated individual apps?

Basically, the aim is to make sure that:

1. Music used for ringtone shall be less than 40 seconds, otherwise you will have to manually clip it to fit within that length.
2. iPhone ringtone format is m4r by design. If you have m4a, you can simply convert m4a to m4r by changing the extension name; for mp3 or other format, you might need a converter.
3. Ringtone is synced from Mac to iPhone via the right interface. Previously, it is done in iTunes tones bar. Now with Finder, tones bar is missing, while all the other iTunes utilities such as backup, music syncing and file sharing are well-integrated into Finder.

DearMob iPhone Manager Simplifies the Steps to Set Custom Ringtone
Best iPhone Manager for macOS Catalina

This iOS data management tool running on Mac and Windows has ringtone maker built-in, you can sync old tones from PC/Mac to iPhone, or create new ringtones with any song you like.

★ Drag and drop previous iTunes ringtones to iPhone easily.
★ Create custom ringtone with ANY song, auto-convert to m4r.
★ 1-click back up iPhone, transfer photos, videos, music, etc.

Related: Everything you need to know about macOS Catalina>>

You can use the newly added music app to clip songs into 40s, change m4a to m4r in Finder folder, but the tones section in iTunes doesn't integrated into Finder on Catalina beta version, so this is a dead end for now. Luckily, the old way that utilized GarageBand still works, though this 1.6GB app might be unfriendly to your old and tired iPhone.

Before we jump into the workaround that involves dozens of steps, let's first take a look at a much simpler solution.

[Easy Solution] Create custom ringtone in Catalina - The iTunes-less macOS

This light-weight iOS tool – DearMob iPhone Manager stands 100% ready to manage iPhone, sync tones, music, videos (even your own collections), photos and 10 more types of file between iPhone, iPad and Mac. Let's start with its built-in ringtone maker:

Step 1. Download and install DearMob iPhone Manager. Connect your iPhone to Mac, make sure to unlock the screen and tap trust this computer.

Create and Sync Ringtone in Catalina to iPhone

Step 2. Go to Voice>Ringtone>Add Ringtone>(Make Ringtone).

Backup iPhone with Finder macOS Catalina

Tips 1. You can simply drag and drop any song or old ringtones into the ringtone area.

Tips 2. You can find old ringtones (indentified by m4r file type) in ~/Music/iTunes/iTunes Media/Tones/ (If you are previously on iTunes 12.7). For later versions, it depends; you might find ringtones in the import folder within media folder, main iTunes folder or media folder.

Step 3. Drag the green knob to set ringtone starting point, and blue knob for ending point. Hit OK, Sync. The selected section will be transferred to your iPhone in the ringtone section.

Backup iPhone with Finder macOS Catalina

Prefer a video tutorial? Watch this YouTube tutorial below: How to Create Ringtone and Sync to iPhone on macOS Catalina.

Related: How to Make a TikTok a Ringtone for iPhone >>

How to Create Custom Ringtone in Catalina with Music, App Finder and Garageband

Heads up: in Catalina beta version, there is no tones tab in Finder. Using Music and Finder, you can finish the job to clip music and convert m4a to m4r, but you will still need an iOS transfer tool to put that m4r right into the tones on iPhone. Another workaround is using iCloud drive in Finder plus Garageband iOS version, here are the steps:

Step 1. Lauch Finder on macOS Catalina, click iCloud drive on the sidebar, drop your music here, it will start uploading to the cloud.

Step 2. On your iPhone, install and open GarageBand, tap at the + plus icon, and scroll to song creation.

Step 3.Choose any kind of the audio input, it doesn't matter here because we are going to import songs from iCloud.

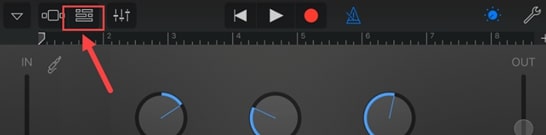
Step 4. Now you will see the working area with a three-line icon at top left. Hit it to bring out the loop icon.

Start to make custom ringtone in GarageBand

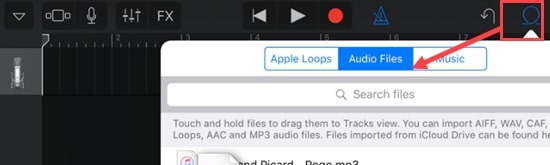
Step 5. Poke at that loop icon > Audio Files tab> Import from iCloud Drive. Make sure you have enabled iCloud drive for Garageband.

Import songs from iCloud drive to GarageBand

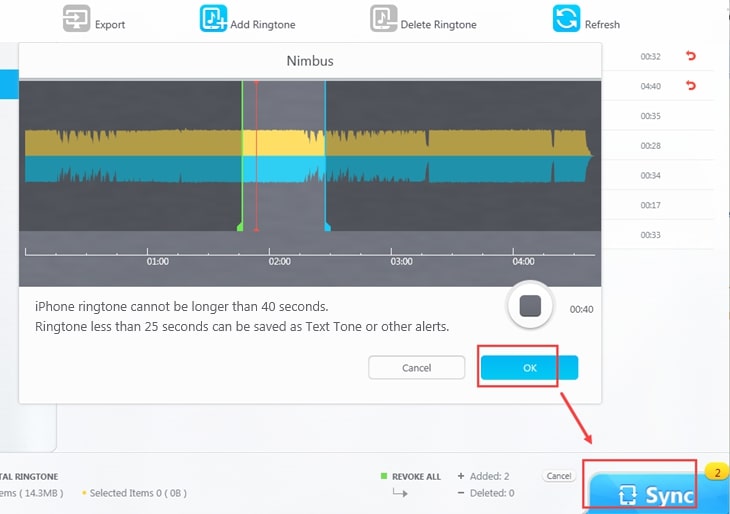
Step 6. Drag preferable song into the working area and release your finger. Playback and select a section no more than 40s, trim off the rest of the track. Make sure to drag the song to the left to avoid leaving a blank section in the beginning.

Save newly created ringtone in GarageBand

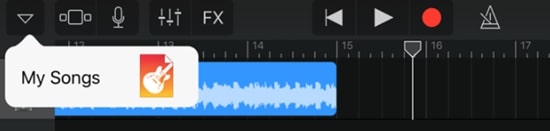
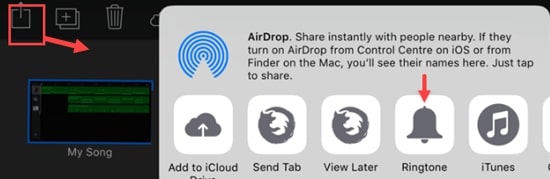
Step 7. Hit the upside down triangle icon to save your would-be-ringtone, back to the main UI, select and share this newly-created song. Now you will see a ringtone icon available as one of the sharing choice.

set selected song as ringtone in GarageBand

Step 8. Tap at Ringtone, go through all the process such as naming your custom ringtone, and you will find it appear in your ringtone in settings > sounds & haptics.

Final Words

Until the next update of Catalina, sync ringtone to iPhone with DearMob iPhone Manager is the best choice as it is easy and effective. The upcoming macOS Catalina is a mixed blessing. Dividing up iTunes might make sense, besides tones section missing in Finder, we start to miss iTunes import and burn CD utilities. Are you happy with Catalina? Share with us your ideas.

Guess You Like:

Home | About | Contact Us | News | Privacy Policy | Agreement | Site Map

Copyright © 2024 Digiarty Software, Inc. All Rights Reserved.
5KPlayer & DearMob are brands of Digiarty Software, Inc. Any third party product names and trademarks used in this website are property of their respective owners. All the related logos and images, including but not limited to Apple's AirPlay®, Apple TV®, iPhone®, iPod®, iPad®, iTunes® and Mac® are registered trademarks of their own. Digiarty is not owned by or affiliated with Apple Inc. or any of those companies.