Getting a new iPhone is an exciting experience, but the thought of moving all your precious memories, contacts, messages, and apps can often feel daunting. For anyone upgrading to the latest iPhone model, switching from an older device, or simply needing to transfer data from one iPhone to another, ensuring a fast, complete, and secure migration is paramount.
This comprehensive guide will walk you through every reliable method on how to transfer data from old iPhone to new, covering Apple's built-in solutions like iCloud and Quick Start, as well as powerful third-party tools like DearMob iPhone Manager. We'll help you choose the best approach for your needs, offering solutions for both full device migrations and selective file transfers that avoid overwriting existing data.
How to Transfer Data from iPhone to iPhone via iCloud
convenient option, particularly if your total data size is under 5GB. When undertaking a transfer from an old iPhone to a new one via iCloud, should your content exceed this free 5GB tier, you'll simply need to upgrade to a paid iCloud storage plan to complete the migration.
Alternatively, for those seeking more flexibility or wishing to avoid iCloud, dedicated iOS data management tools offer another effective way to transfer data from one iPhone to another without relying on Apple's cloud service.
Step 1. Back Up Your Source iPhone
On your old iPhone, go to Settings > Tap at [Your Name] > iCloud > iCloud Backup > Back Up Now.
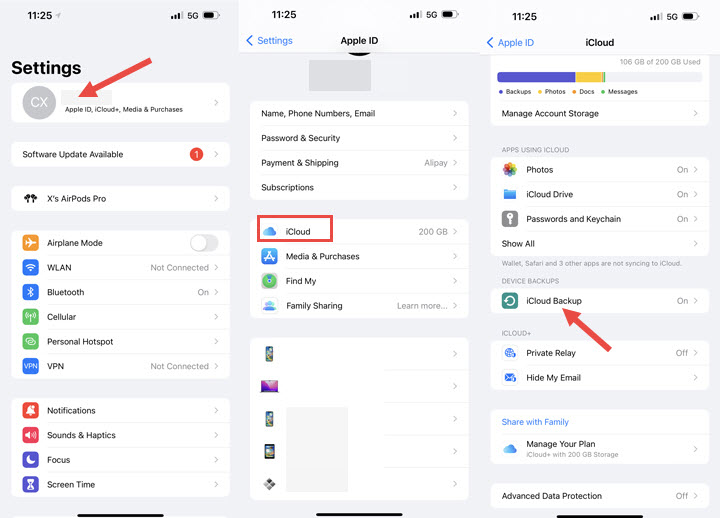
Note: In iOS 10.2 or earlier versions, iCloud is listed right under settings.
Step 2. Transfer data from iPhone to iPhone.
Now, it's time to transfer your backed-up data to your iPhone. This process applies whether you're setting up a brand new device, restoring to a different iPhone, or even recovering data on your current phone after a reset.
1) Transfer Data from iPhone to iPhone When Setup
To transfer data from your old iPhone to your new one using iCloud backup when setup, follow these steps: Power on your new iPhone and select your preferred language > Connect to a Wi-Fi network > Set up Face ID or Touch ID and create a passcode > On the Apps & Data screen, choose to Restore from iCloud Backup.

2) Transfer Data from iPhone to iPhone After Setup
If you have completed the setup process already for your new iPhone and couldn't find the option to restore from iCloud backup, try the following steps: Go to Settings > General > Reset > Erase All Content and Settings > Erase Now, and then set up your iPhone again > Select Restore from iCloud Backup, sign in and select the backup you just created to restore.

Bonus: How to Selectively Transfer Data from iPhone to iPhone with iCloud Sync
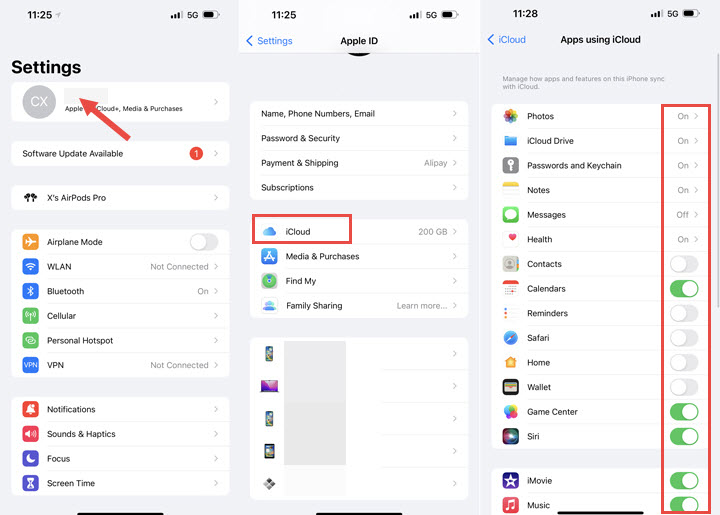
For those who wish to perform partial data transfer on their iPhone device, you can check out iCloud sync, which allows the ability to sync photos, mail, calendar, notes, contact, files, etc.
Step 1. On your old iPhone, go to Settings > [Your Name] > iCloud. Toggle on the content types you need to sync.
Step 2. On your new iPhone, repeat Step 1, and wait for the selected content to be transferred to the new device.
How to Transfer Data from iPhone to iPhone via Quick Start
Quick Start offers a seamless solution to transfer data from iPhone to iPhone when setting up a new (or recently erased) device, often without needing to rely solely on an iCloud backup. This method is particularly popular for its direct device-to-device migration capability.
If both your source and destination iPhones are running iOS 12.4 or later, Quick Start enables a direct wireless data transfer through the "iPhone Migration" option. This means you can transfer all your data from your old iPhone to your new iPhone directly, without first uploading it to iCloud.
Note: Quick Start Requirements
To ensure a smooth iPhone to iPhone data transfer using Quick Start, please check the following:
- iOS Version: Both your source and destination iPhones must be running iOS 12.4 or higher.
- Proximity: Keep both devices close to each other throughout the entire transfer process. For faster, more reliable transfers, consider using a USB3 Camera Adapter and a Lightning cable to connect the two iPhones.
- Power: Plug both devices into power. This is crucial to prevent accidental shutdowns, especially when transferring large amounts of data from iPhone to iPhone.
- Connectivity: Ensure both devices are connected to Wi-Fi and have Bluetooth enabled.
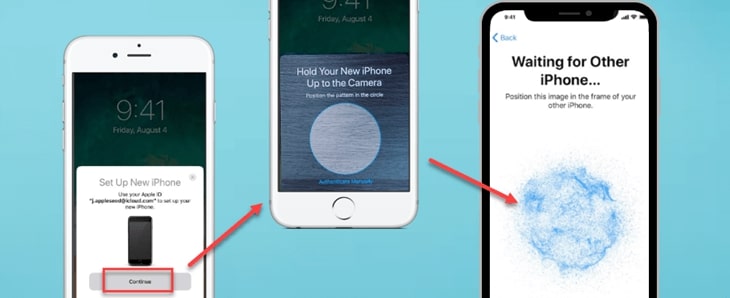
Step 1. Initiate Quick Start
Turn on your new iPhone and place it near your current (source) device. A "Set Up New iPhone" prompt should appear on your current device. Follow the on-screen instructions to begin.
Troubleshooting Tip: If the prompt doesn't appear or disappears, restart both iPhones and try again.
Step 2. Authenticate and Set Up Your New Device.
On your old iPhone, use its camera to scan the unique animation displayed on your new iPhone. If scanning isn't possible (e.g., camera malfunction), tap "Authenticate Manually" and follow the prompts. Next, on your new iPhone, enter the passcode of your old iPhone, then proceed to set up Face ID or Touch ID.
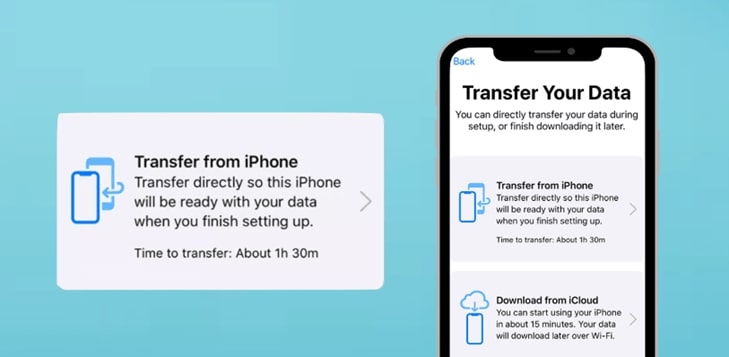
Step 3. Choose Your Data Transfer Method
You'll be presented with options on how to transfer data to your new iPhone:
- Transfer from iPhone: This is the recommended option for direct iPhone Migration. It directly transfers all your data from your old iPhone to the new one wirelessly (or wired, if connected). This feature was introduced in iOS 12.4.
- Download from iCloud: If you select this, your data will be restored from an iCloud backup that you previously created on your source iPhone. This is the traditional method of restoring data from an iCloud backup.
Step 4. Complete the iPhone Data Transfer
Follow any remaining on-screen instructions to finalize the setup. The iPhone data transfer process will then begin. You will see an estimated remaining time on both screens. It's vital to keep your devices close to each other and connected to power until the data migration is 100% complete.
Note: Transfer times can vary significantly based on factors such as network conditions (for wireless transfers), the amount of data being transferred, and whether you're using a wired connection.
How to Transfer Data from iPhone to iPhone via Prepare
Apple's "Prepare for New iPhone" (or iPad) feature offers a convenient way to transfer data from iPhone to iPhone by providing temporary iCloud storage for your entire device backup. This ensures a seamless iPhone migration to your new device, even if you don't have an existing paid iCloud storage plan. It's designed to prevent any data loss when you're upgrading or switching to a new iPhone.
Note:
- Storage Reversion: After your new iPhone is set up and data transferred, your iCloud plan reverts to its previous state.
- Data Management: Apple automatically deletes the temporary backup after 21 days or once your new device is restored. If unused within this timeframe, the data is permanently removed.
- Recommendation: While convenient, for ultimate peace of mind, we recommend also backing up your iPhone to your computer (via Finder on Mac or iTunes on Windows) before any major data transfer. This provides an additional layer of security.
Step 1. Access the Transfer & Reset Options.
On your old iPhone, navigate to Settings > General > Transfer or Reset iPhone.
Step 2. Initiate "Prepare for New iPhone" Backup
Tap on "Get Started" located under the "Prepare for New iPhone" (or "Prepare for New iPad") section. Then, tap "Continue". Your iPhone will begin uploading all your apps and data to iCloud, creating a temporary, up-to-date backup ready for your new device.
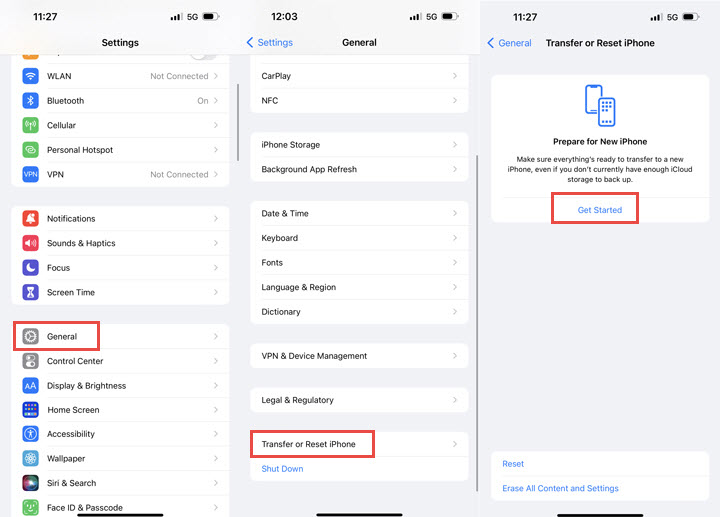
Tip: You can check on the backup progress on the main Settings screen, and if you need more than 21 days of temporary storage, you can ask Apple to extend your free storage.
How to Transfer iPhone to iPhone (Fast, Flexible, Risk-Free)
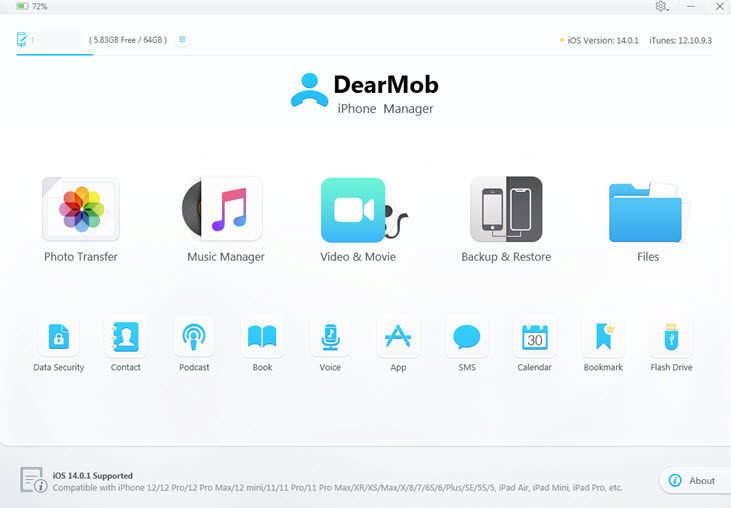
For those who prefer to perform a flexible transfer without overwriting the existing data on the target phone or those who are reluctant to go through hours of transfer to use the new iPhone, you can check out DearMob iPhone Manager, a capable iOS data transfer tool on Windows/Mac.
Whether you're looking to transfer iOS data from an old iPhone to the new iPhone 16/Plus/Pro/Pro Max, or simply want to transfer content from one iPhone to another, DearMob iPhone Manager provides a safe and easy solution. This robust iOS manager allows you to selectively transfer all or some of your iOS content to your iPhone without deleting any data on the destination iPhone. You can also create an incremental backup of your old iPhone and restore it to the new iPhone.

Why Should You Transfer iPhone Data via DearMob iPhone Manager
- Backup and transfer photos, contacts, videos, music, books, podcasts, and more.
- Quick & secure data migration for new iPhones, with options for full/selective content.
- Back up your entire device or specific data to your computer without storage constraints.
- Extra features: create ringtones, convert media format, encrypt files, unlock DRM, etc.
- Experience rapid and reliable transfers without freezing or data corruption.

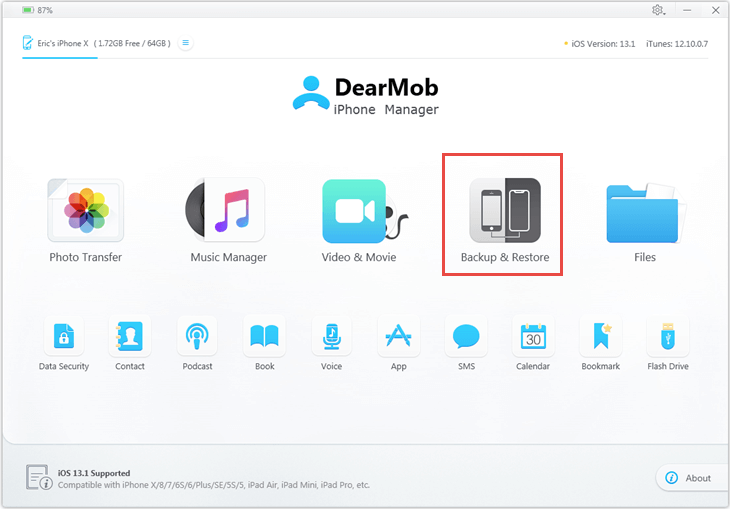
Step 1. Create a Full Backup of Your Old iPhone
Free download and install DearMob iPhone Manager on your PC or Mac. Connect your old iPhone to the computer. In DearMob iPhone Manager, go to the "Backup" section. For enhanced security, tick "Encrypt your backup" and set a password. You'll need this password when restoring. Click "Backup Now".
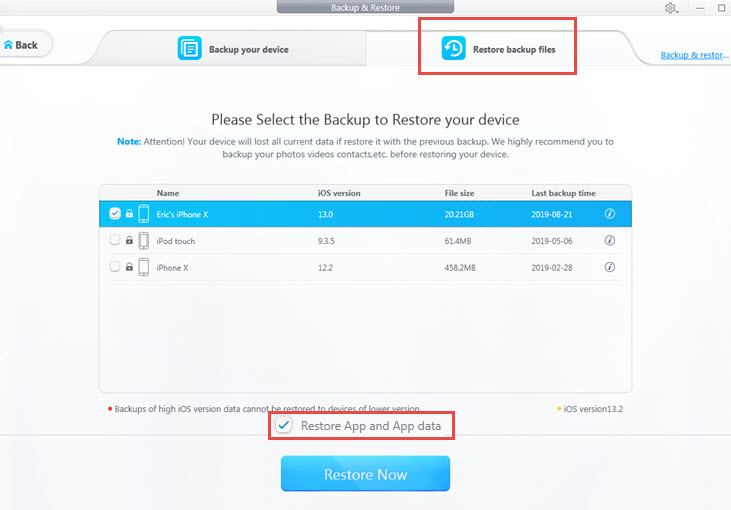
Step 2. Restore the Backup to Your New iPhone
Once the backup is complete, disconnect your old iPhone. Connect your new iPhone to the computer. On the DearMob screen, click the "Restore backup files" tab. Select the backup file you created in Step 1. Tick "Restore App and App data" if you want to transfer all your apps and their associated data. Click "Restore Now."
After the Transfer:
Once the restoration is complete, your new iPhone will display the Apple greeting screen. Proceed with the standard iPhone setup. If you see apps with a cloud icon on your home screen, simply tap them to download them from the App Store.
Bonus: How to Selectively Transfer Specific Data from iPhone to iPhone
DearMob gives the option to transfer the desired data from one iPhone to another, without erasing existing data on the target iPhone. And here is how:
Step 1. Export Desired Data from Your Old iPhone to Your Compute
Connect your old iPhone to the computer. In DearMob, navigate to the specific data category you wish to transfer, such as Photos, Music, Video, Contacts, Books, or others. For example, if transferring photos, go to Photos, select all or some of the photos you want, and then click Export.
Tips:
- You can opt to export photos into year/month/date folders in settings, which keeps your photos well-organized.
- Apple ProRaw is natively supported with metadata included.
Step 2. Prepare Your New iPhone for Import
Once the export from your old iPhone is complete, disconnect it from the computer. Now, connect your new iPhone to the computer. In DearMob, navigate to the corresponding data category on your new iPhone where you intend to import the files. In my case, I need to go to the Photos section.
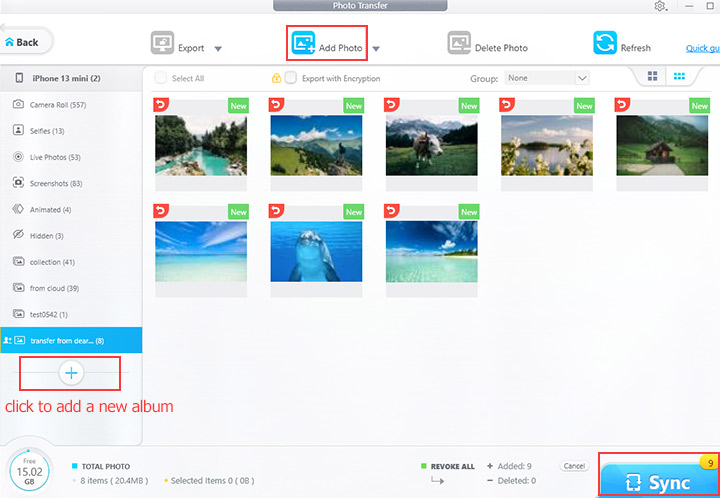
Step 3. Import the Exported Data to Your New iPhone
Click the + Add Photo button. Browse the computer to select the exported files in Step 1 and then click Sync. That's it.