Back Up iPhone Without iTunes (1-Click All or Selectively)
By Joakim Kling - Last Updated: | Contact Author
Whether you want to update to the latest iOS 26, switch to the new iPhone 17, or revive an old iPhone, it is always advisable to back up your iPhone data in advance to prevent unnecessary data loss.
Apple's traditional backup methods, whether iTunes or Finder, create a single, comprehensive backup. You have no way to selectively back up or restore specific files — such as only photos or contacts — without restoring the entire device. Furthermore, you cannot create multiple backups at different points in time to a specific storage location.
Here, we'll show you how to back up iPhone without iTunes, regardless of where you want to store the backup, how to perform the backup, and which files to include in the backup.
On this page
Part 1: Fully 1-Click Backup iPhone to Computer without iTunes
Most of the time people wanted a 1-click iPhone backup tool to back up everything from your iPhone and restore it later to your new iOS or new iPhone. Why? Because it simplifies matters and saves trouble. But backing up iPhone with iTunes is often frustrated, iTunes backup session failed and other errors crop up now and then.
With DearMob iPhone Manager, the backup process will be much more lucid and straightforward.
Why Choose DearMob iPhone Manager Over iTunes
- • Fully 1-click backup all your iPhone data over cable or Wi-Fi connection
- • Freely change the backup location, number of backups, and backup content
- • Unlimited access to transfer, sync, and backup anything on your iPhone to computer
- • Option to password encrypt your backup files with military-grade algorithm
- • Preview individual iPhone files on PCs and Macs, make iPhone ringtone and convert music to .m4r

How to Backup iPhone to PC without iTunes
Step 1: Connect your iPhone to your computer with the USB cable.
Step 2: Tap "Trust This Computer" on your iPhone screen.
Step 3: Launch DearMob iPhone Manager and click "Backup".
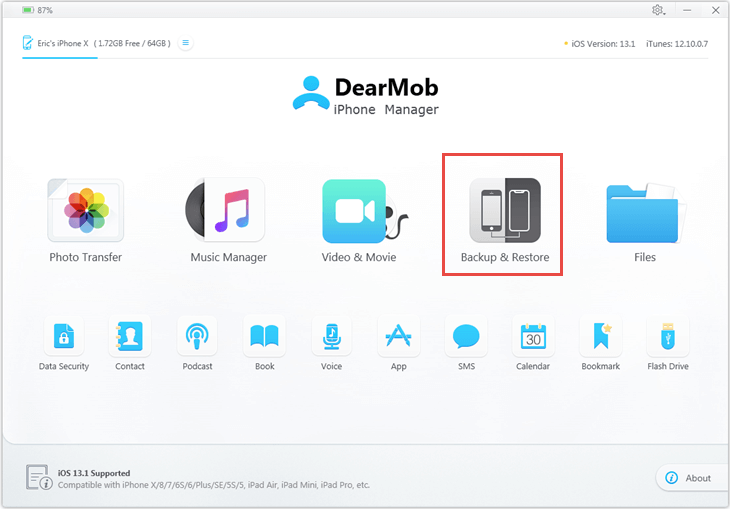
Step 4: Simply click on "Back Up Now" and you will get a full iPhone backup file.
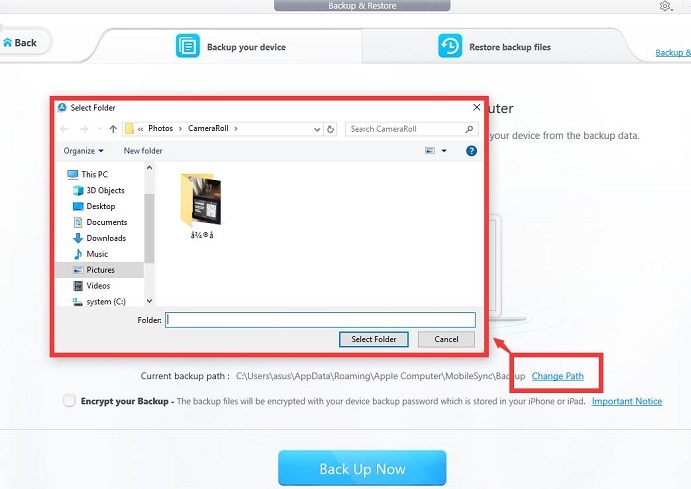
Note: You can change iPhone backup location to any other folder if you want.
Advantages of 1-Click Backup iOS Device with DearMob iPhone Manager
- • No iTunes needed, you don't need to install iTunes or any Apple service.
- • You can encrypt your backup to password protect your iPhone data.
- • After testing, backing up iPhone with DearMob iPhone Manager is relatively faster than with iTunes.
- • DearMob iPhone Manager can restore your iTunes backup files as well. This means you can restore iPhone backups without iTunes even if your previous files are backed up with iTunes.
Part 2: Selectively Backup iPhone to PC without iTunes
iTunes can't back up only specific types of data, which is painful if you want to preserve important iOS content besides a full backup. A dedicated iPhone manager can easily back up specific iOS data to your computer by category (e.g., photos, videos, music, contacts, books, etc.). This is a selective backup.
With DearMob iPhone Manager, you can easily and selectively back up any or part of your iPhone files without using iTunes. All you need to do is select the data you want to back up by category or file, whether it's photos, music, books, or contacts.
Advantages of Backup iPhone Contacts Selectively with DearMob iPhone Manager
- • Allow to preview and selectively export contacts from iPhone to your computer.
- • 1-click backup 1,000 copies of iPhone contacts and merge duplicates in 30 seconds.
- • Available to backup iPhone contacts in VCF, PDF, TXT, HTML.
- • Password-protect iPhone contacts with military grade encryption method.
- • Option to sync iPhone contacts with PC/Mac contacts.
How to Selectively Backup iPhone without iTunes
Take iOS photo backup as an example.
Step 1: Go to Photo Transfer and select the photos you'd like to backup.
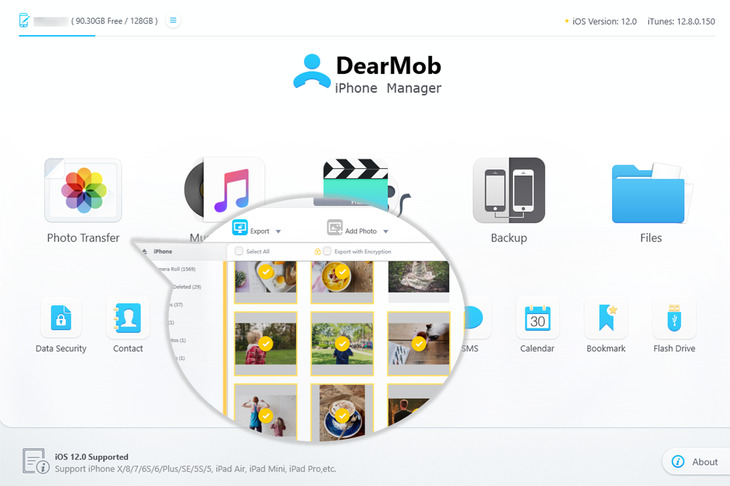
Step 2: Click "Export" button to transfer photos to computer as a backup copy.

Highlighted features
• Advanced backup HEIC to JPG: you can click "Export HEIC to JPG" from the "Export" drop-down menu.
• Option to encrypt your iPhone photo backup: Your can check the "Export with Encryption" box to backup iPhone photos in an encrypted manner.
• Super fast: Backup 1000 4K iPhone photos in less than 2 minutes.
Take iPhone contacts backup as another example.
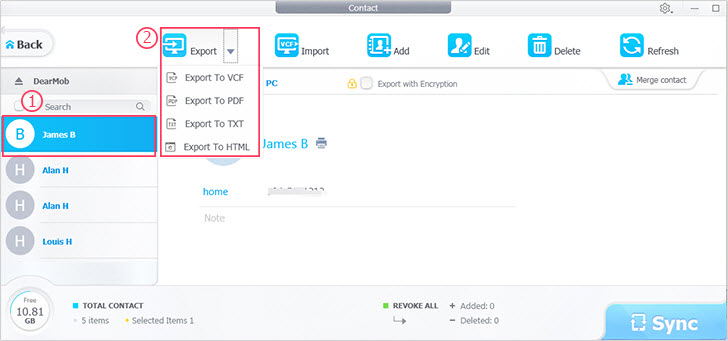
Step 1: Launch this iPhone contacts backup manager and click on "Contact" button.
Step 2: Select the contacts you'd like to backup.
Step 3: Click "Export" button to backup iPhone contacts without iTunes.
Part 3: Restore iPhone from Backup without iTunes
Please note that Restore iPhone and Restore iPhone from backup are two different ideas. Restoring iPhone will delete all content and settings from your iPhone, restore it to factory settings and install the latest iOS software at the same time; As for restore iPhone from backup, it will restore all the content and settings in that backup file to your iPhone. We are dealing with restoring iPhone from backup in this post.
#1. How to Restore iPhone from Backup
Make sure to turn off "Find My iPhone", and USB connect iPhone to computer before proceeding.
Step 1: Launch DearMob iPhone Manager, and go to Backup from main screen.
Step 2: Under Restore backup files tab, choose the backup file you want, and hit Restore Now.
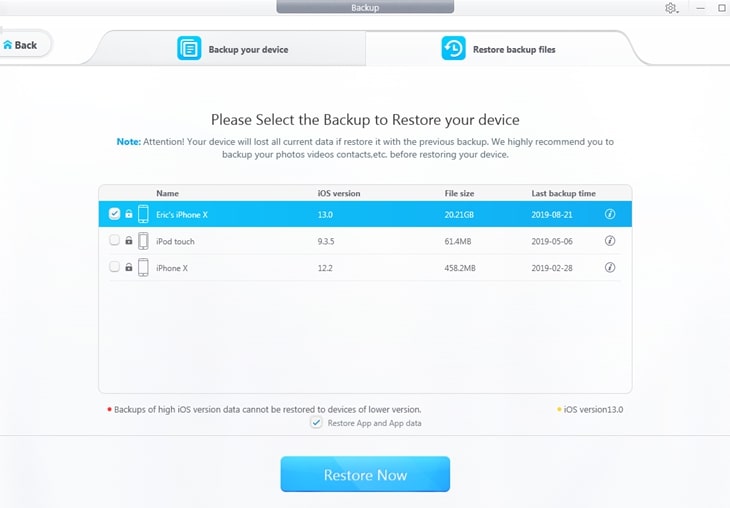
Step 3: Stay your iPhone connected to the computer the whole process until you see the greeting screen on iPhone. Follow instructions on iPhone to finish the setup.
Tips: In similar simple steps, you can go to videos, songs, contacts, books and other category from the main screen, and drag and drop corresponding files to add to iPhone.
#2. How to Restore Selected Data to iPhone & iPad
Sometimes we want a fresh start on brand new iOS devices, while selectively restore some types of files to iPhone or iPad. iTunes fall short in this aspect, as it will restore the full backup to your handset, that's where DearMob iPhone Manager comes to your aid.
Let's say you only want to restore photos to iPhone, here is the simplest way without erasing existing data:
Step 1: Plug in your iPhone, and go to Photos from DearMob iPhone Manager main screen.
Step 2: Click the + icon to create an album, click Add photo.
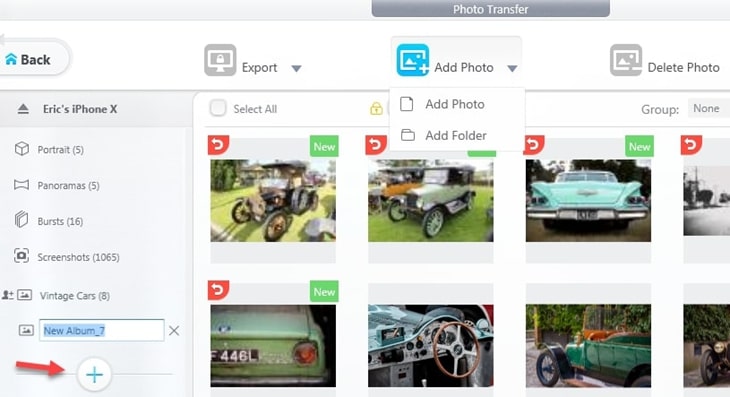
Step 3: Select previously exported photo copies, and hit Sync.
On your iPhone, go to Photos App> Albums, scrolling down and you will see newly added albums and pictures.
Further Reading
Full iPhone Backup VS. Selective iPhone Backup
One-click full backup and selective backup each have their advantages and disadvantages. iTunes is Apple's native mobile device management tool, while DearMob iPhone Manager offers a more flexible data transfer and backup solution. Here's a simple comparison.
Feature |
iTunes Full Backup |
DearMob iPhone Manager |
|---|---|---|
Backup scope |
Entire device including unwanted data |
Full backup or selective backup of user-chosen files |
File accessibility |
Files renamed, no direct viewing |
Easy access to individual files |
Restore flexibility |
Full restore only, replacing all data |
Selective restore; add files without data loss |
iOS restore support |
No support for newer to older iOS restore |
Supports selective restore across different iOS versions |
Data safety on restore |
Risk of data loss due to overwrite |
Safe merge of old and new data |
What is an Incremental Backup
When you backup iPhone and iPad to the computer for the first time, iTunes will perform a complete backup. Just like taking a snapshot of what your device is like at that time. Next time when you backup the same device again, iTunes will add new data and changes on existing content, thus an incremental backup is made. That also means you will have only one backup file for one device, as iTunes continues to update that backup folder.
Should you want to keep several backup files of the same device, each reflecting the status of the device at a certain point in time, then you can archive iOS device backup to prevent iTunes from overwriting the existing backup folder.
FAQs
1. How Do I Backup My iPhone When it Says Not Enough Storage?
By default, iTunes saves iPhone backups to the C drive of your Windows system. If your C drive has insufficient space, you need to free up disk space and delete any corrupted iTunes backup files, as iTunes can't change the backup location. Alternatively, you can use an iPhone management tool like DearMob iPhone Manager, which allows you to choose different storage locations and perform selective backups.
2. How to Archive iTunes Backup on Mac?
On the iTunes menu, go to preferences. Under the Devices tab, right-click the backup file you create and choose Archive.
If you are on macOS Catalina (10.15), backup your iPhone with Finder, and go to preferences in Finder. Tap into Devices and right-click to archive your device backup.
3. How to Create an Archived Backup on Windows PC?
Windows version of iTunes doesn't provide you with the right-click option to archive iPhone backup. When iTunes on Mac archive an iPhone backup, it adds a timestamp to that backup folder. You can do the same thing manually on Windows to save multiple backups on computer.
#1. Go to iOS device backup location on Windows.
•Where is iTunes backup location? C:\Users\[User/Administrator]\AppData\Roaming\Apple Computer\MobileSync\Backup
•Or go to C:\Users\[User/Administrator]\Apple\MobileSync\Backup if you are using iTunes Microsoft Store Version.
#2. Find the backup folder of your devices identified by UUID. Add timestamp in the format of [Device UUID]-yyyymmdd-hhmmss.
• What is iOS device UUID? UUID is a string of numbers and letter combinations unique to each iOS device.
• Why there is already a folder with timestamp before manual archiving? If you find another backup folder with a timestamp, and can't remember typing in the timestamp manually before, that's just a backup set auto-created by iTunes when restoring your iPhone or when backing up the same device on different iOS versions.