By Joakim Kling - Last Updated:
Contact Author
iTunes Backup Session Failed: What's Next after You Tried All Tactics Online
 Already tried everything from other post? Here is the real fix for backup session faild error.
![]() Spotlight - DearMob iPhone Manager vs. iTunes
Spotlight - DearMob iPhone Manager vs. iTunes
Among numerous warning and error that iTunes throws at us, "iTunes backup session failed" could be a hair-pulling situation that drives you crazy. This error could happen either when you are trying to give your iPhone a full backup or when you are trying to restore an iPhone from a backup file, as exemplified by these Apple users:
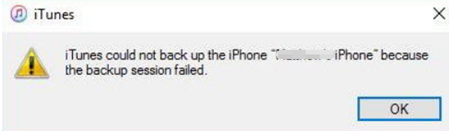
…I have not been able to back up since last week. I updated iTunes and now, whatever device (iPhone, iPad or iPod) I use, I get this message "iTunes could not back up the iPhone because the backup session failed"
…I clicked "Restore Backup" and chose the file. After some time, it would stop and provide the following error message: "iTunes could not restore iPhone because the backup session failed."
You may have already tried everything below:
- Restart your iPhone, iTunes and computer;
- Change USB cable or switch USB port;
- Log in as administrator on your computer;
- Run iTunes Diagnostics for device connectivity test and devices sync tests.
…And hesitate to take follows steps:
(Because they either eat up your time or require some tech nerve in case your mess up with system files)
- Update your iOS, computer OS and iTunes to the latest version;
- Disable firewall and disable or even uninstall your antivirus software
- Uninstall iTunes and Apple Services and even delete files from c:\program files\common files\apple
- Delete old backup file or Rename backup folder
- Reset the Lockdown folder (find detailed instruction in part 2)
- Change Backup location or Free up Space on C: partition (find detailed instruction in part 3)
- Go through procedures as per instructions from Apple Support.
In fact, you can save time-consuming tactics for last resort.
Let's Start from the Easiest to the more Demanding Method to Fix iTunes Backup Session Failed The Key: to verify whether iTunes or other things go wrong before next moveThe Easiest Solution
We are going to work like this: firstly, use any other program that allows you to perform a backup or restore of iPhone. If it works, then there is nothing wrong with afore mentioned checklist that you hesitate to fiddle with. If it doesn't, then you can move to the more demanding method covered later in this article.
To finish the test, you will need to download and install DearMob iPhone Manager, a light weight yet powerful iOS tool that runs without iTunes, thus never affected by iTunes flaws.
DearMob iPhone Manager - The Bug-free Way to Backup & Restore iPhone
- No Apple ID restriction; backup multiple iPhone, iPad & iPod
- Option to selectively backup some files - photos, videos, contacts, books etc.
- Drag-n-drop data from iPhone to computer and backwards
- Never erase anything because data are not synchronized but transferred


Follow these steps after you plug in iPhone and unlock screen to trust the computer.
Step 1. Launch DearMob iPhone Manager and go to "Backup".
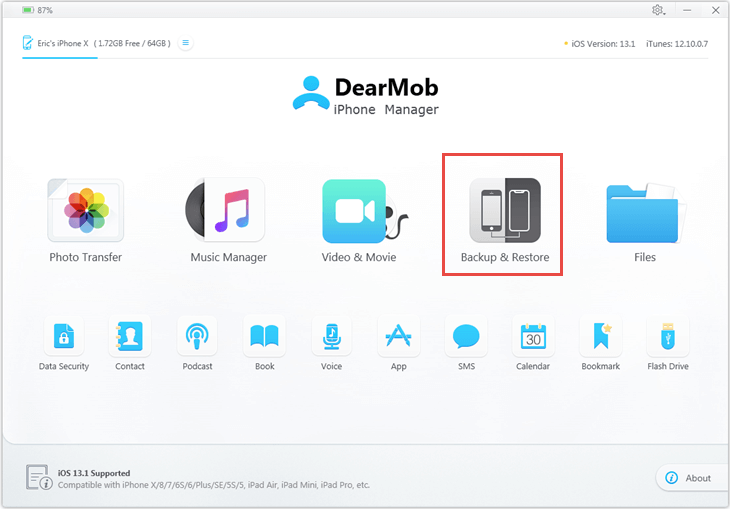
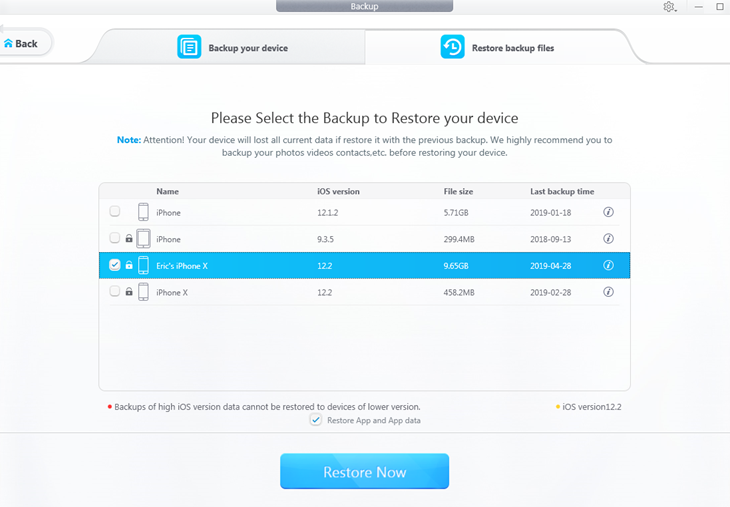
Step 2. Click "Backup Now" or Switch to Restore tab to "Restore Now".
Wait for the tool to finish its job, and then you will see a success message.
Solution 2 – Reset the Lockdown Folder to Fix iPhone Backup session Failed
iTunes errors related to start a session or backup session failed can sometimes be settled by resetting the lockdown folder.
But it's better to consider this as one of your last resort because reset the lockdown folder can cause unexpected errors if you miss a step or do something wrong. If you are willing to take the risks, here is how:
For Windows users:
Step 1. Disconnect all your apple devices with the computer, and quit iTunes and other Apple services.
Step 2. Go to C:\ProgramData\Apple, you will find a folder named "Lockdown". If you failed, go to computer>Organize>Folder and search options, and make sure you checked "Show all folders".
- For Windows Vista, go to C:\Users\USERNAME\AppData\roaming\Apple Computer\Lockdown
Step 3. You will see a bunch of files with the extension ".plist". Delete files within the lockdown folder. Make sure you are deleting files within it, not to delete the folder itself. Files are named after your device UUID, which you can check with DearMob iPhone Manager.
Step 4. Restart iTunes and try to backup or restore your iPhone to see whether the program runs without a hiccup this time. You will be prompted to trust this computer in the beginning and this should recreate .plist files in your lockdown folder.
For Mac Users:
Step 1. Shutdown iTunes and other Apple services, and unplug your iPhone.
Step 2. Open up Finder, in the menu bar, hit Go > Go to Folder (shortcut shift+cmd+G), and then type in /private/var/db/lockdown/
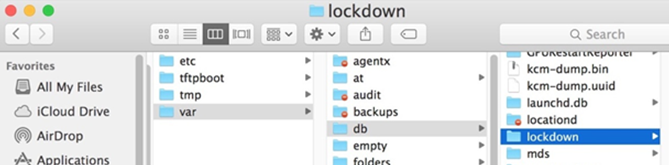
Step 3. Right click on the plist files and hit "Move to Trash".
Step 4. Relaunch iTunes and plug in your iPhone and try backup or restore again.
The corrupted lock down files could also create errors when you are transferring photos from iPhone to Mac. For instance, if you are using Image capture or Mac Photos app to import photos, it will say your iPhone is locked.
Solution 3 –Tackle with System Files: Delete Old backup, Rename Files, Change Backup Path
This solution requires some knowledge about file structure and how to use command lines, and it might solve one problem and create other problems since you are fiddling with system files. If you are looking for a idiot-proof method that solves the problem automatically, go back to the easiest way in the first part.
Delete Old Backup Files
For Windows Users:
Step 1. Go to \Users\(username)\AppData\Roaming\Apple Computer\MobileSync\Backup\
Step 2. Under the backup folder, you will find subfolders named with 40-digit mix of numbers and letters, which is your device UUID, unique to each Apple Device. Select backup files that you no longer need to delete.
Step 3. Launch iTunes to try backup or restore again.
For Mac Users
Before macOS Catalina: Go to iTunes menu bar > Preferences > Devices; right click on a backup file to delete it.
If you are on macOS Catalina: Go to Finder, plug in your iPhone, hit manage backups to delete unwanted backup files.
Change Backup Location
iTunes default backup location is in C: partition, which cannot be changed within the software. Even though you can delete old backup files from time to time, it will hit the storage limit sometime. If you don’t mind tinkering hours of work and deal with command lines, you can read up on How to Change iTunes Backup Location from Disk C: to fix iPhone backup session failed.
Rename Files
By doing so, you can trick iTunes to think that the backup folder no longer exists, and results in recreate a backup folder to start backup session. Some users report it to be helpful, and it also fix iPhone never been backed up to iTunes error, you can check detailed steps in that article.
Final Words:
Sometimes one cannot help but suspect whether Apple spend enough time and effort in improving iTunes at all, given the never ceased "Help!" thread in forums to fix iTunes errors. If you still prefer an offline backup method than using iCloud, DearMob iPhone Manager could be your life changing tool to manage iPhone. You can treat it like an iPhone explorer that allows you to flexibly transfer and backup data without erasing problem.