
I have big videos and photos on my iPhone to import to my Mac. I tried to send all the photos via AirDrop, but it’s too time-consuming. Any quicker way will be highly appreciated. – A user from AppleVis forum.
You may already how to transfer photos from iPhone to Mac, but not all methods suit your specific needs, just like the user saying above. And things may get trickier when transfering 48MP photos from iPhone 16/15 Pro and iPhone 16/15 Pro Max, because they are larger and require robust apps to keep the original image quality.
In this post, we summed up 7 best methods to send photos from iPhone to MacBook Air/Pro and other models, for vaiours needs - regular backup/management, occasional sharing, wireless transferring, and lossless syncing. Check it out.
1. Transfer Photos from iPhone to Mac via DearMob
If you have ever used Mac photos app to import iPhone photos, you would know that photos are stored in Mac photos library, a database which you cannot directly access. This kind of mechanism could be great and bad at the same time.
If you prefer to import and view photos in folders via Finder, like any other files you create and stored in folders, DearMob iPhone Manager offers the most efficient way to send files between iPhone and Mac with USB or Wi-Fi. It reveals all your photos to import, like say, camera roll, synced from iTunes, etc. Meanwhile, it enables you to view and transfer photos by albums/date/type.
DearMob iPhone Manager - Transfer Photos from iPhone to Mac without USB
- No quality loss, won't erase EXIF data, geotag, timestamp kept.
- Stable and fast transferring speed reaches up to 60MB/s.
- Safe offline transfer, no need to sign in with Apple ID or iCloud account
- Unlimited batch transfers of photos between iPhone and Mac, and iPhone and Windows.
- Available for all iOS devices, iPhone 16/15 Pro Max, iPhone 16/15 Pro, iPhone 16/15/14/13/12/11/X/7.
- Also works to transfer videos, music, books, PDFs, voice memos, and 15+ file types.
Step 1: Install DearMob iPhone Manager, a dedicated iPhone iPad transfer and backup App.
Step 2: Connect your iPhone to Mac via USB or connect to the same wireless networking. Open Photo Transfer in DearMob.
Step 3: Select photos and hit export to send them from iPhone to Mac.
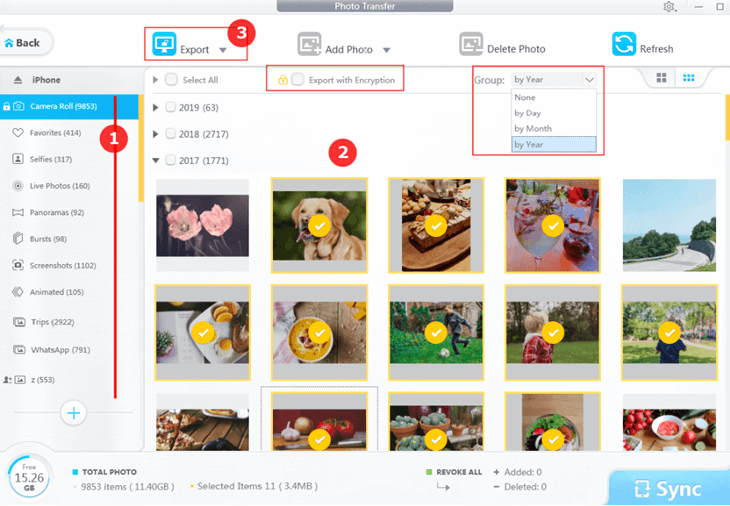
All your photos will get imported to Mac at original quality, without compression, and Exif data maintained in no time.
Video Tutorial
2. Transfer Photos from iPhone to Mac in Image Capture
Image Capture allows you to move photos into any folder and rename them with certain rules.
When you import photos from iPhone to Mac using the Photos app, the imported pictures are stored in the so called photos library. You need some workaround to reveal the photos in Finder folders. If you prefer not to import photos to library database, Image Capture is one of the simplest ways.
Where is Image Capture on my Mac?
Image Capture is one of the pre-installed app on your Mac, and you can find it in Finder > Applications. The quickest way to open up Image Capture is to use command + space to call out the spotlight search, and type Image Capture. Below is how to import photos from iPhone to Mac with Image Capture.
Step 1: Launch up Image Capture, and connect your iPhone to Mac using the original cable, in order to avoid errors such as connection failed.
Make sure to unlock your screen, and tap trust this computer. This is to grant access to your iPhone on your Mac.
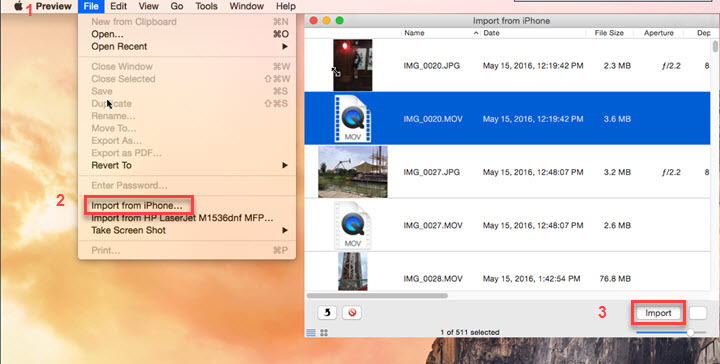
Step 2: You shall see list of photos in Image Capture. At the bottom, there is an option: Import to Desktop. You can change the destination, and transfer photos to any folder on Mac.
Step 3: Select photos you prefer and click Import at bottom right, or you can simply click Import All.
Step 4: If you want to delete imported photos from iPhone, right click and hit Delete. Note that the deletion is permanent and cannot be undo.
Note: Image Capture sometimes doesn’t recognize your iPhone, prompts some error when it’s launched, or freezes during a transfer, and so forth. For many users, it’s hard to figure out the exact cause and fix it. If this happens to you, resort to other tools in this post.
What to do when Image Captures Says Please Unlock Your iPhone
It's annoying that Image Capture says please unlock your iPhone while you already did.
If you already tried:
- • Unlock your iPhone and enter into the screen
- • Unplug and re-plug iPhone
- • Update iOS and macOS to the latest version
…and non of above works, then it could be because the "lockdown" file is corrupted. The lockdown file is stored on your Mac, which controls the authorization of the Mac's access to iPhone.
You can delete the corrupted file, so that the "Trust this computer" dialog box will appear on your iPhone again. When you hit trust, it will create a new "lockdown" file on your Mac.
3. Transfer Photos from iPhone to Mac via AirDrop
AirDrop is an easy way to quickly get photos off iPhone to Mac wirelessly. If you have a few photos to share to Mac, AirDrop frees your from cables and all the other hassles. However, if you are planning to backup hundreds or thousands of photos to Mac, AirDrop might mess things up.
Where do Airdrop files go on Mac?
By default, Mac saves photos received from AirDrop to the Downloads folder.
Preparations - To make your devices successfully see each other, make sure:
- iPhone personal hotspot is turned off;
- iPhone and Mac stay close to each other, with Bluetooth and Wi-Fi turned on;
- Mac is 2012 models or later, and runs OS X Yosemite or higher versions;
- iOS device is powered by iOS 7 and higher versions.
Get all things done, and we can start to send photos from iPhone to Mac via AirDrop now.
Step 1: Make sure AirDrop is enabled on your Mac. Go to Finder > AirDrop, and click Allow me to be discovered by: contacts only (Or everyone).

Step 2: On your iPhone, to go Photos > All photos, tap Select at top right, and select photos you prefer.
Step 3: Tap the share icon ![]() , and select your Mac to AirDrop photos.
, and select your Mac to AirDrop photos.
If your Mac and iPhone are using the same Apple ID (and therefore the same iCloud account), photos and files sharing from iPhone will auto save to the Downloads folder. If iPhone is not using the same account as Mac, you just simple go click Accept when prompted.
4. Transfer Photos from iPhone to Mac via iCloud
If you are the cloud syncing guy/gal, iCloud photos syncing makes things easier when you have upgraded iCloud storage. Free 5GB iCloud plan is far from enough when your phone shots 4K photos.
Syncing photos from iPhone to Mac via iCloud is great when you have subscribed for large iCloud storage plan and are using the same Apple ID on Mac and iPhone. But think twice if your scenarios are…
- You want to keep photo album structure;
- You don't want iCloud to change Timestamp and other Exif data;
- You have large gigabytes of photos to transfer in short time.
Here's how to transfer photos from iPhone to Mac without USB via iCloud:
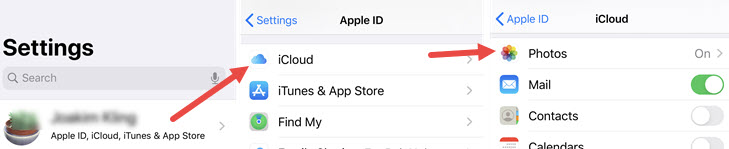
Step 1: Turn on iCloud syncing on iPhone.
Go to settings > [Your Name] > iCloud > Photos. Toggle on iCloud photos.
To save iCloud space, you can toggle off Upload Burst photos. By doing so, burst photos won't sync, except favorite ones (burst photos that you hearted).
Step 2: Turn on iCloud syncing on Mac.
Go to Mac menu > System Preferences > iCloud. Tick iCloud Photo Library (or iCloud Photos depending on your macOS version).
Then all your photos reside in iPhone will synchronize to Mac Photos App via iCloud, on promise that your iPhone and Mac are using the same Apple ID.
If you want to export iCloud photos from Mac Photos App to Mac folders, you can select photos within the App, and go to File > Export > Export [numbers] items to select a destination folder.
Disambiguation: In earlier versions of iOS and macOS, iCloud Photos was known as iCloud Photo Library.
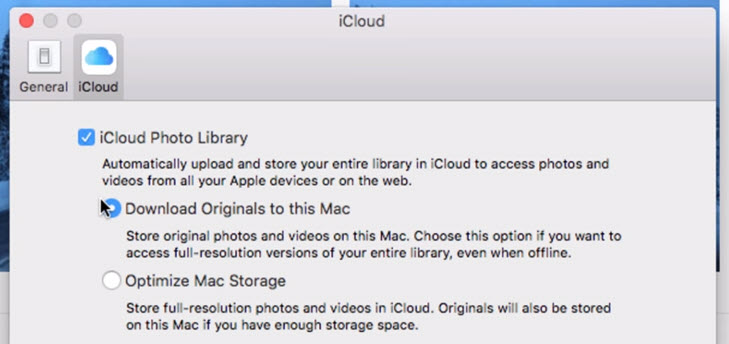
On your iPhone or Mac, go to Settings > [your name] > iCloud > Photos, so that you can select whether you want to optimize storage or not.
Optimize iPhone/Mac storage: your photos are uploaded to iCloud at original resolution, and what remains on your device are photos with reduced quality, which you can thinks of as thumbnails.
Download and keep Originals: Photos synced to iCloud and stored on your device are all in original resolution, meaning you have two copies, one in the iCloud server, one on your device.
5. Transfer Photos from iPhone to Mac via Email
If you need to download a handful of photos from iPhone to Mac, sending yourself an email is quick and easy. The only thing to note is, the mail app might remove geotagging information of photos, depending on the size you choose. If you want to give it a shot, here're steps to send photos from iPhone to Mac via emails.
Step 1: Go to photos app, and tap select to choose photos you want.
Step 2: Tap the share button, and hit Mail app. You can also use other mail app besides the default one.

Step 3: Send your photos as attachment. Choose photo quality if your mail app has that option.
6. Transfer Photos from iPhone to Mac in Google Photos
If you are using iPhone and Android devices, Google Photos could be a nice option to moving photos to Mac. As it have cross platform apps to consolidate your pictures and other files. With15GB free storage space.
Please note: if you are using iCloud photos previously – or you may not even be aware of this – make sure your photo is stored at full resolution locally on your iPhone, instead of being optimized versions (you can think them as thumbnails). Because Google Photos might not be able to see these photos, let alone syncing to Google cloud service. Hence the preparation:
On your iOS device: Go to Settings > [Your name] > iCloud > Photos. Go tap Download and Keep Originals. Then you can start to transfer photos from iPhone to Mac without USB.
Step 1: Install and open up Google photos on your iPhone. Go to Menu > settings > back up & sync. Toggle it on.
Step 2: Within back up & sync, tap Upload Size and select High quality or Original quality per your needs.
Step 3: On your Mac, visit Google Photos. Select photos and click three-dot More > download.
Note:
- DNG files on iPhone can be uploaded (such as Lightroom for iOS raw photos).
- Photos larger than 16MP will be resized to 16MP in resolution (if you choose Highquality).
- Original quality stores photos and videos in the original resolution, no file size reducing or compression.
- Photos larger than 200 MB or 150 MP won't be uploaded to Google Photos.
- Photos smaller than 256x256 in size won't get uploaded
7. Transfer Photos from iPhone to Mac in Continuity Camera
This method works for the following scenario: you have taken a photo with iPhone or iPad camera, and for it to instantly appear on the project you are working on in Mac, Continuity Camera is the best way.
If you want to move hundreds or thousands of pictures already in photos app to Mac, you can refer to methods above.
Before get started, make sure your devices meet the system requirement: iOS 12 or later; macOS Mojave or later.
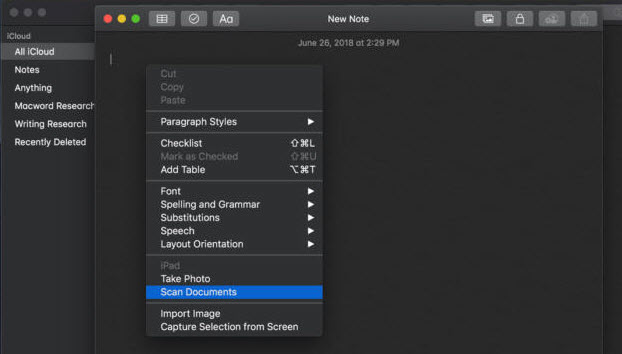
Step 1: In a note, put your cursor to the place you want to insert a photo.
Step 2: Click file > Insert from iPhone or iPad > Take photo.
Step 3: Take a photo with your iPhone, and then ahead tap use photo.
Step 4: Photo you just taken will be transferred to Mac right in place of the cursor.
All of the methods above are working for Apple users. If you want the best one that solves all your problems with file management, DearMob iPhone Manager is the right one sparing no effort to help you. Free download with full features of DearMob iPhone Manager for Windows and Mac now.