"I love photographing, especially when I got my iPhone with all-new dual 48 MP cameras. But quickly my iPhone got stocked, I need an easy way to transfer my iPhone photos to computer, anyone can help?"
Surely, there are many other benefits of moving photos to your PC computer, for example, backup the precious memories to avoid data loss.
Moving photos from iPhone to the computer is also a must when you need to polish your iPhone photos with desktop-based video editing software like Adobe Photoshop and Lightroom.
Thus, we list 8 efficient ways to import photos from iPhone to computer. Whether you want to import photos from iPhone without Autoplay or you need to copy photos from iPhone to PC, you can find the desired solutions.
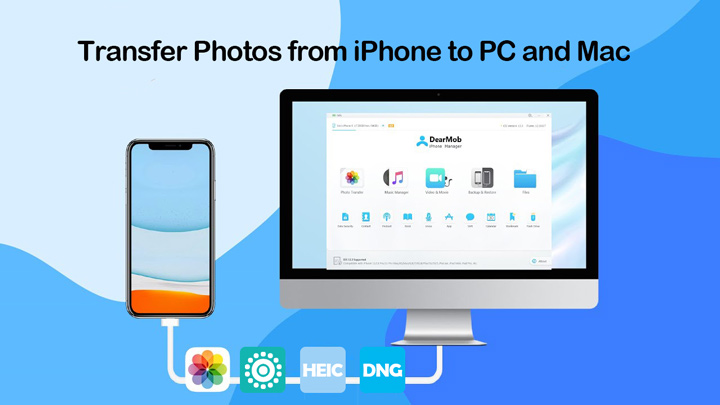
Transfer Photos from iPhone to Computer via DearMob
The best way to download photos from iPhone to a computer is using DearMob iPhone Manager. This handy tool can help you backup, transfer, and manage iOS 18/17/16/15/14/13/12 content in a deadly efficient and easy manner.
With it, you can move all iPhone photos to your computer or selectively transfer them. DearMob can retain the original album structure, so your photos will be displayed as how they are presented on the iPhone. You can also filter through date, month, and year to fast navigate to the loved photos.
Better yet, it can read and display all kinds of videos and pictures stored on your smartphone, including HEIC, HDR, 48MP/12MP photos, and the newest Apple ProRaw images in DNG format.

Quickly Transfer Photos from iPhone to Computer via DearMob
- Transfer 10K+ photos between iPhone and computers within 2 minutes
- Keep or convert HEIC/Live/Apple ProRAW/GIF photos in an intuitive way
- Pre-organize your phones by albums in the chronological order
- Keep the original quality, album structure, and geotagging information…
- Fully or selectively backup iPhone photos by year/month/folders/albums/types

How to Transfer Photos from iPhone to Computer with DearMob
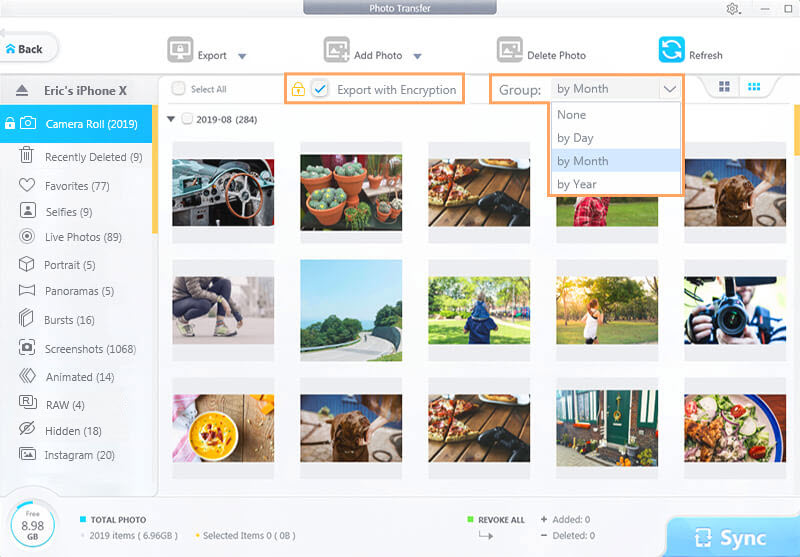
Step 1. Go to the Photos Browse tab.
Step 2. Browse and select the photos that you want to transfer to the computer.
Step 3. Click the drop-down button of "Export" and then choose direct Export or to Export HEIC to JPG.

The Photo panel in DearMob iPhone Manager groups photos by albums and types, making it easy and convenient for you. You can explore photos in camera roll, hidden album, favorite, screenshot, selfies, panorama, live photos, recently deleted, etc. Exporting photos by folders will keep all the photos better organized.
DearMob iPhone Manager also works nicely on Mac, you can use it to transfer photos from iPhone to Mac or backward.
Video Tutorial
How to Import Photos from iPhone to Computer with iCloud Photos
iCloud is another popular solution for transferring photos from iPhone to computer and vice versa. With WiFi gets connected and your Apple ID logged in, you can upload new photos or videos to your personal account wirelessly and view them anywhere anytime on your iPhone, iPad, iPod touch, Mac, and PC.
You can directly watch your iPhone photos on a computer with the network required, or you can download iPhone photos to a computer for watching offline.
Disadvantages:
- This method will consume a lot of internet traffic
- iCloud only offers 5GB storage space for free storing
- Not let you select multiple pictures to upload from iPhone to iCloud at a time
Step 1. Sign in to iCloud with your Apple ID to access your iCloud personal center on your iPhone and computer.
Step 2. Tap the target photo on your iPhone, press the Share button at the bottom left, choose Add To iCloud Drive, and then select the folder used for holding the photo.
Step 3. Go to your computer and click the Photos button in your iCloud. A window with all photos you upload shows up, choose one or several photos you like to download.
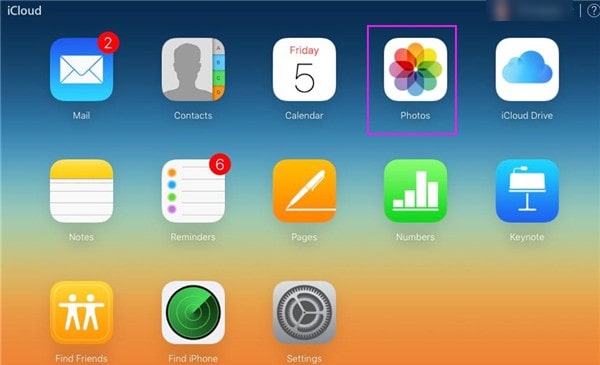
Step 4. Press the download arrow on the top right of iCloud Photos. Now the photos on your iPhone have been downloaded to your computer, you can find them in your Downloads folder.
How to Import Photos from iPhone to PC with Dropbox
To transfer photos from your iPhone to a computer, you can use Dropbox or other file hosting services.
Disadvantages:
- Dropbox only offers 2GB storage space for free storing
- You can only pick one or multiple iPhone photos by moment for adding to Dropbox
- It won't retain the original structure of the albums on iPhone
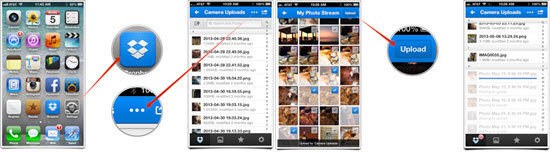
Step 1. Download and install the Dropbox app on both your iPhone and Windows PC.
Step 2. Open Dropbox on your iPhone, press the + icon at the top left corner, and then hit Upload Photo.
Step 3. Select the target photos for adding to Dropbox.
Step 4. Open Dropbox on your PC. Open the folder that holds the iPhone photos and then move them to the PC.
How to Import Photos from iPhone to Computer with Email
You can always email yourself tons of photos from your iPhone and download them from your computer.
Disadvantages:
- Occasional errors, such as unable to attach files and files keep loading and time out
- It only allows for at most 20 items to be selected to send in iMessage
- It's a time- and traffic-Disadvantages:uming solution
Step 1. Browse your photos on your iPhone and select photo albums or several photos.
Step 2. Tap the Share icon and then select iMessage, Apple Mail app, or your specific email app, e.g. Outlook.
Tips: If you cannot find your personal email app icon in the list, simply slide to left and click More. By hitting the "Option", you can choose to transfer photos via the iCloud link or as individual photos.

How to Import Photos from iPhone to Computer with iCloud Photo Stream
My Photo Stream can synchronize up to 1000 still photos that you took with your iPhone in the recent 30 days across your iDevices. Thus, when enabled the Photo Stream feature, you can easily import the latest photos to Windows.
Disadvantages:
- Can't transfer iPhone live photos to computer
- It's a time- and traffic-consuming solution
- The Photo Stream feature is already phased out
Step 1. Go to Settings on your iPhone, tap the Apple ID profile, and then select iCloud.
Step 2. Tap Photos and toggle on My Photo Stream.
Step 3. Get iCloud downloaded on your Windows PC.
Step 4. Go to the top menu bar, click on Photos and choose Preference.
Step 5. Choose iCloud and select My Photo Stream. iPhone will then synchronize your iPhone photos to iCloud Photo Stream when the WIFI is available. After that, you can check and download these iPhone photos on the computer.
How to Transfer Photos from iPhone to PC with Windows Photos
There's another option to transfer photos from iPhone to computer without iCloud - using the Windows Photos app. This app comes pre-installed on Windows 10 and can help you download your iPhone photos to your PC instantly and effortlessly. You can also use the Photos app for Windows to collect, view, or edit your photos.
Disadvantages:
- This method only works with Windows 10 or 11 OS, and not runnable on an older version of Windows
- You need to have the latest version of iTunes installed on your Windows 10 or Windows 11
- Can't preview photos to compare which one is better to pick and transfer
- The Photos app does not offer a way to upload photos to the cloud automatically
- No thumbnails. One cannot identify which are the needed ones
- Not retain the original album structure
Step 1. Connect your iPhone to Windows 11/10 PC with a USB cable that supports file transfer. Unlock your iPhone and trust the computer if prompted.
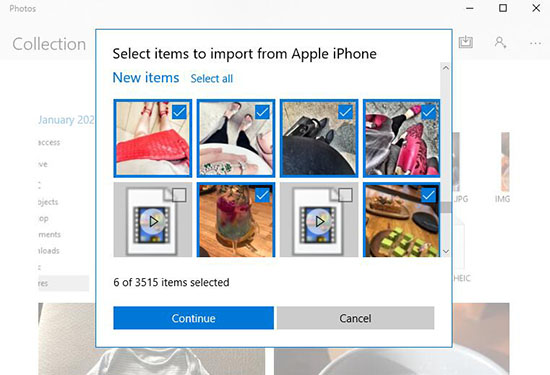
Step 2. Launch up the Photos app on Windows, scroll down to the bottom, click Import, and choose From a USB Device.
Step 3. Choose the photos that you want to transfer to Windows and then click on Import Selected.
Step 4. Select the folder used for storing the photos. Photos app starts to detect and transfer the selected photos to the PC.
How to Transfer Pictures from iPhone to Windows via File Explorer
The File Explorer on Windows can recognize iOS devices natively, with which you can import photos from iPhone to the PC.
Disadvantages:
- Might fail to read your iPhone photos
- Photos are named with IMG_xxx, which makes it hard to navigate or pinpoint a picture
Step 1. Connect your iPhone to the PC with a USB cable that supports file transfer.
Step 2. Enter the passcode on your iPhone to allow it to connect to your PC.
Step 3. If you are on Windows 8/10/11, simply press the Windows key and E to open File Explorer. You can find your iPhone under Devices and Drives. As for Windows 7 users, you can find your iPhone under Computer.
Step 4. Select your iPhone displayed on Windows Explorer, double click Internal Storage, and then hit the DCIM folder.
Step 5. Select all folders or open folders to select certain pictures to copy and paste them from iPhone to the computer.

How to Transfer Pictures from iPhone to Windows 7 with AutoPlay
Windows 7 users can make use of the native AutoPlay tool to move photos from iPhone to PC.
Disadvantages:
- Only transfer the photos under the Camera Roll to your PC
- Can't preview the iPhone photos
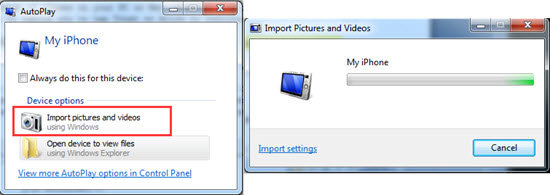
Step 1. Connect your iPhone to the computer with a USB cable that supports the file transfer.
Step 2. Click Import Pictures and Videos using Windows on the pop-up AutoPlay window.
Step 3. Hit the Import Settings link. On the pop-up window, click the Browse button, and then select the target output folder.
Step 4. After setting up the import options, click OK to download photos from iPhone to Windows.