
Backing up your photos from your iPhone or iPad is essential when upgrading to a new device, like moving from an iPhone 13 to an iPhone 17, or installing a new OS. Unexpected events, such as device malfunctions, theft, or technical glitches, can lead to the loss of irreplaceable memories. Plus, with large image files, especially 48MP photos from recent Pro models, ranging from 25MB to 75MB each, just 20 to 30 photos can quickly use up around 1GB of storage. By backing up your iPhone photos to your computer, you can protect your memories from both technical failures and storage limitations, ensuring your photos stay safe and accessible whenever you need them.
1. How to Backup Photos from iPhone in Batch or Selectively
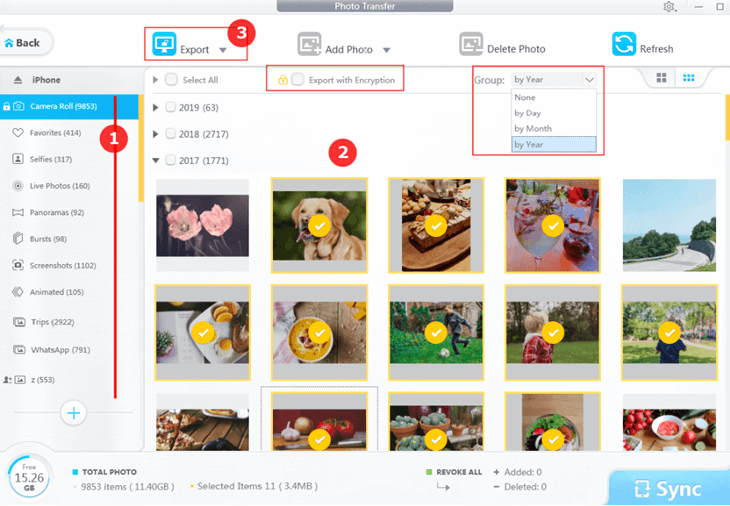
The most flexible way to back up photos from your iPhone or iPad is using DearMob iPhone Manager. This powerful iOS backup and management software lets you back up photos at lightning-fast speeds. It only takes minutes to back up 10,000 photos! One of its standout features is selective backup. It displays your albums just like on your device, so you can export all photos or only the ones you want from specific albums. Even better, you can easily sort and back up your photos by date - year, month, or day.

Why DearMob iPhone Manager is the Best Choice
- Back up photos from iPhone and iPad with original quality and EXIF data
- Fastest backup ever—10,000 photos in just 2 minutes
- Supports HEIC, JPEG, BMP, and more, with an optional HEIC to JPEG conversion
- Browse and export photos while keeping the original album structure
Step 0. Unlock your iPhone and connect it to your computer. On your iPhone screen, tap Trust This Computer when prompted. This authorizes your computer to access your iPhone.
Step 1. Install and launch DearMob iPhone Manager. Click the settings icon to choose the folder where you want to save your photo backup. Click the Photos icon to enter the panel where you can back up photos from iPhone.


Step 3. Select all or some of the photos, and click Export. If you want extra security, choose Export with Encryption to protect your backup from privacy leaks.
Tips
- You can group photos by month, year, or day, then back up photos from a specific date or date range.
- You can also select albums like Selfies, Captured, etc. (just like on your iPhone) and back them up under their original albums for better organization.
A window will pop up with all the copies of photos when the backup process finishes. If you have multiple iPhones and iPads, you can restore these photos to iOS 18/17/16/14/15/13 devices flexibly. This tool allows you to transfer photos from a computer to iPhone and iPad at original quality.
Pros:
- Backup photos at full resolution, original quality.
- Keep photo metadata, file name and timestamp.
- You can also selectively restore photos to iPhone from the backup copies.
- Also works for iPhone videos, music, books, contacts, etc.
Cons:
- Doesn't work for Android phones.
- It runs on Windows and Mac. No Linux version currently.
2. How to Back Up Photos from iPhone with Windows Explorer
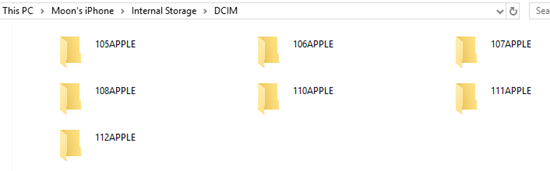
This method allows you to connect iPhone to a Windows PC as a camera device, and copy out all the photos stored in your camera roll. Once you enter the internal storage, you shall see folders named 100APPLE, 101APPLE, 100CLOUD, etc. All your cameral photos and videos are stored chronologically into these folders, from 100APPLE to the lasted one.
Pros:
- The native free way.
- No software installation.
Cons:
- Cannot backup the original version of edited photos.
- Photos stored on iCloud cannot be backed up.
- Photos in 100CLOUD folder (and the alike) are thumbnails at low resolution.
- Photos and videos are mixed together.
- Cannot view photos by ablums, screenshots, bursts, etc.
Step 1. Connect your iPhone to computer, and remember to unlock your screen, and keep it unlocked the entire time to prevent backup breach.
Step 2. Open Windows explorer, and click your device > Internal Storage > DCIM folder.
Step 3. Copy all the folders to the local drive on your computer. You can also backup photos to NAS and external hard drive.
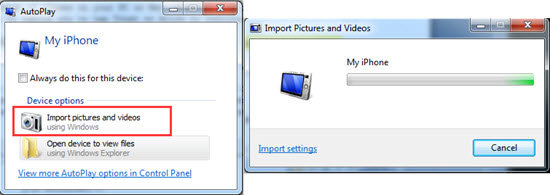
3. How to Back Up iPhone Photos Using Auto Play on Windows
AutoPlay window pops out when you connect your iPhone, iPad and other devices such as digital camera to the computer. You can select Import pictures and videos to directly select photos. The second option in the pop up Window Open up to view files allows you to manage DCIM folders, that is, the same as method 1.
Pros:
- Native way for Windows 7 users, free of charge.
- If you always import photos to a certain folder, AutoPlay will skip previously imported photos.
Cons:
- If the process crashes in the middle when you have large quantity of photos, it could waste your time to check which photos are yet to be imported. Plus, it shares all the other drawbacks as DCIM folder method above.
Step 1. Connect your iPhone to computer, and you shall see the auto popped AutoPlay Window.
Step 2. Click Import Pictures and Videos.
Step 3. Click the Import Settings, choose the target folder by clicking the Browse button.
Notice: Only Camera Roll photos can be transferred via AutoPlay. And by using AutoPlay, you cannot preview all your photos. If AutoPlay fails to work, you can either transfer iPhone photos to PC using Windows Explorer.
'4. How to Back Up Photos from iPhone Using Windows 10 Photos App
You can use Photos app for Windows to transfer photos from iPhone to PC, and collect, view, or edit your photos.
The best thing about Windows photos App is its integration with OneDrive, with which you can sync photos across all your devices.
Pros:
- Import and group by date/month/year.
- Option to delete imported photos.
Cons:
- Cannot import photos by albums.
- Cannot detect photos previously synced from a computer.
- Won't skip photos already imported into Photos app*
*For instance, when you IMG_8994.jpg for three times, you will get IMG_8994(1).jpg and IMG_8994(2).jpg copied. Though with the Photos app, it only displays one version. The drawback is, this could take up too much storage space on your Windows before you realize the problem.
Follow these steps to import photos as a backup copy:
Step 1. Unlock iPhone and plug it to your PC, tap Allow authorize this computer to access your photos.
Step 2. Open up Photos App on Windows 10, and click Import on top right corner.
Step 3. Check photos you want to import for a backup, and click continue.
By default, you can find imported photos in C:\\Users\[User name]\Pictures\[folder name]
If you want to change importing path, you can click more options to select path.
5.How to Back Up iPhone Photos with Mac Photos App
photos to free up storage on iPhone. It is the de facto Mac photo manager that organizes photos on Mac, in a library-based architecture, with integrated function to access iPhone and iPad photos.
To use Mac photos App as a way to backup iPhone pictures, we are referring the backup are simply the copies of photos. It is not the kind of backup as in Time machine, which are created for restoration usage. If you are seeking for incremental photo backup, see iTunes method below.
Import iPhone Camera Roll to Mac Photos App:
Step 1. Unlock iPhone screen and plug it to a Mac.
Step 2. Launch Photos app, select Import All New Items or Import a number of selected iOS pictures.
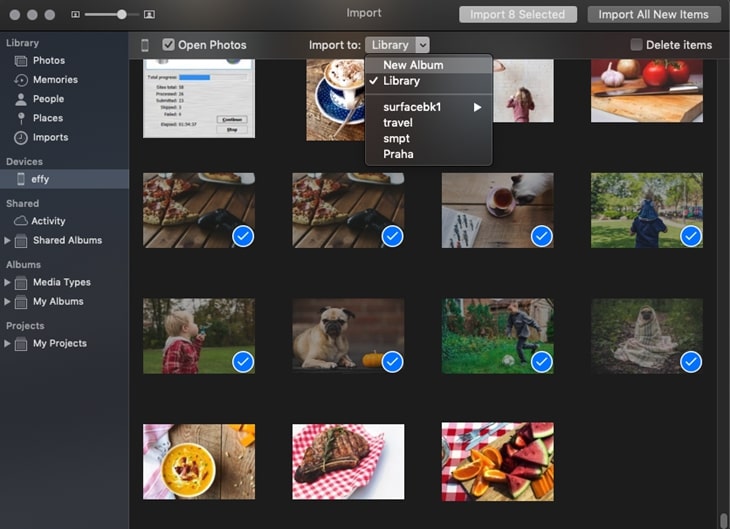
- Check Delete Items if you want the picture to be deleted from iPhone after importing.
- By default, imported copies are stored in Imports section of the photo library, you can select other albums before importing begin.
Step 3. Further organize photos with smart album feature.
Pros: Auto-detect previously imported photos, so that you won't create duplicated copies of photos for a backup.
Cons: Only works one directional, i.e. from iOS devices to Mac. You cannot restore photos to new iPhone with Mac photos app.
6. How to Back Up Photos from iPhone using iTunes (Not Viewable)
Update: If you are using macOS Catalina, use Finder instead. The process is the same as using iTunes.
Note: This method creates a full backup of your iPhone, with camera roll photos included, along with other content. You cannot view photos in the backup, which is created for later restoration usage. For instance, on your new iPhone, you can restore this backup to get all the photos, content and settings cloned.
To get started, make sure you have enough storage space on your computer. Then follow these steps to backup iPhone to a computer.
Step 1. Launch iTunes and USB connect your iPhone/iPad to a Windows PC or a Mac.
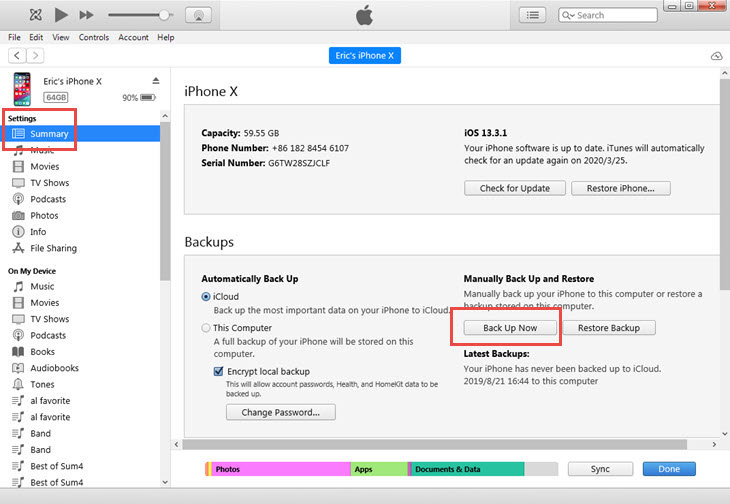
If you don't see your device pop up on iTunes sidebar, make sure your iPhone is unlocked, and you have tapped that Trust this computer alert on your device.
Step 2. Click your device, and go to General > Backups, tick Encrypt local backup.
- This allows you to backup health, activity and keychain data. If you don't want to backup those data, uncheck the box.
- If this is the first time you create an Encrypted backup, you will be asked to set a backup password.
- If you don't remember setting a password on iTunes before, but iTunes still asks you to input a password, that's probably because you have set iPhone backup password with third party backup software previously. The backup password is identical, so you can try to use that password.
Step 3. Click Back Up Now.
Make sure to stay your device connected to computer the entire time; otherwise, you might encounter iPhone/iPad disconnected error.
Can I preview photos inside iTunes backup?
No, unless you use iTunes backup viewer or extractor software. iTunes backup are self-contained data in system folders. If you mess up with them, you might accidentally destroy the backup file, leading to restoration failure. iTunes backup folder is stored here:
On Windows: Open file explorer, and go to following path:
\Users\[user name] \AppData\Roaming\Apple Computer\MobileSync\Backup\
On macOS: Open Finder, from menu click Go > Go to, and copy & paste the following path:
~/Library/Application Support/MobileSync/Backup/
7. How to Back Up Photos from iPhone with iCloud
To turn on iCloud photos, go to settings > [Your Name] on top > iCloud, and toggle on photos. You can also turn on My Photos Stream and shared albums once your enabled iCloud photos.
iCloud Photo Backup vs iTunes Backup
Please note iCloud and iTunes are mutual exclusive in terms of photo backup. To illustrate, when you enable iCloud for photos, iTunes backup won't include photos uploaded to iCloud.
If you turn off iCloud photos, but keep enabling iCloud backup, then iTunes will still back up iPhone camera roll photos.
iCloud vs iCloud Backup vs iCloud Drive, What's the Difference
iCloud Drive is the cloud-based file sharing service, similar to Dropbox or OneDrive, only that the account you use is the same as your iCloud account/Apple ID. You can view files in iCloud drive via Files app, launched on
iCloud Backup is the one-click way to archive most of your content on iOS devices into iCloud server, as whole. It will come into use when you reset iPhone or power up a new iPhone, enabling you to select the option Restore from iCloud backup, and pull backup all those content back to your iOS devices.
iCloud as in "Apps using iCloud" under Settings > [User] > iCloud, is the syncing service. It allows you to toggle on or off iCloud syncing for individual Apps. For instance, you can enable iCloud syncing for contacts on all your devices such as iPhone, iPad and Mac; and you can toggle on iCloud photos for Mac and iPad, but keep it off for iPhone; as flexible as that.