By Joakim Kling - Last Updated: September 29, 2025 |
Contact Author
[Solved] Can't Transfer iTunes Purchases to Google Play/YouTube Music
 If you are looking for a 1-click solution, jump to: The method most recommended by us [85%]
![]() Spotlight - DearMob iPhone Manager vs. iTunes
Spotlight - DearMob iPhone Manager vs. iTunes
Help! Is there a Way to Transfer iTunes Purchases to Google play/YouTube Music?
Being able to access iTunes music library from all devices – even on an Android phone – is fantastic, and this is made possible if you upload music to Google Play Music. However, some users find they can't upload iTunes purchases to Google play, that's because some songs in your library are DRM protected music, which can only be played on authorized devices. DRM (Digital Rights Management) is a good move from Apple to discourage piracy, but it causes troubles for users who have purchased songs for personal fair use. iTunes DRM Removal is the easiest solution to fix "can't transfer iTunes purchases to Google play" annoyance.
Update---Oct. 30, 2020--- Google Play Music is deprecated last week, and users can merge their library to YouTube Music with tools provided in the app. For iTunes users, you can use DearMob iPhone Manager to transfer iTunes purchases to YouTube Music or any other music app.
Fix Google Play Won't Upload iTunes Purchases – Enable iTunes Match Service
If you are wondering about how to transfer music from iTunes to Google Play, this solution is half of the story as it only works for music purchased from iTunes Store before 2009. You still cannot transfer Apple Music from your iPhone to Google Play. For an all-around solution, please jump to the 1-click way to upload Apple songs to Google Play.
Please follow these steps strictly in case you mess up the entire Music Library should you miss any steps or operations.
Step 1: Backup the current iTunes folder to an external hard drive so that you can restore it should anything goes wrong.
- For Mac users, go to Finder>Users folder>Your user name>Music folder>iTunes.
- For Window users, go to C:\Users\Administrator\Music\iTunes\iTunes Media\Apple Music\ to drag your iTunes folder to external hard drive.
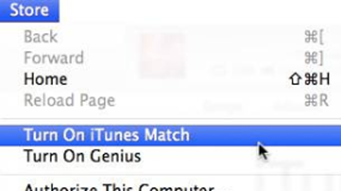
Step 2: Subscribe to iTunes Match via iTunes. If you cannot find the service, select "Store" from the iTunes menu bar and hit "Turn On iTunes Match". After you make the payment of $24.99/year for iTunes match, it will begin analyzing and matching your music.
- Music service varied depending on your region. Therefore, you might not be able to make the transaction if your card is register in a different region from your Apple ID.
Step 3: When the matching process is done, return to the music library and select songs that you purchased from iTunes store. If you have a large library, you might want to enable the "kind" attribute to quickly sort out those songs. To do so, right click on the attribute bar (where "Name" "Artist" belong), and tick "kind".
Step 4: When you sort music by kind, you will see protected music as oppose to Apple Music or other files. Batch select protected ones by clicking the first one and hold down shift to click last one. Then right click and choose "Delete from Library".
Step 5: Click the "Purchased" link on the right side of the window. You will notice cloud-shaped icon besides your music, click it to re-download music from iCloud. When it's done, you will find their "kind " switch from protected to Purchase AAC audio file, i.e., the "iTunes plus" provided by the iTunes match service.
- Important Notice: This works only when the songs or albums you purchased before 2009 that are still available in the iTunes store.
How to Transfer Music from iTunes to Google Play – Burning CD to Strip DRM music
This method only works for DRM music your purchase from iTunes Store. You cannot burn or rip Apple Music. Before you start, make sure you have DVD drive on your computer, and prepare a blank rewritable CD (CD-RW), which can be formatted and reused up to 1000 times. Otherwise, you will need lots of CD-Rs if you have a large library. A CD-RW is capable of storing 80 minutes of music, so you can burn dozens of songs, rip them, format the CD and repeat the burning until you rip all your desired songs. Here are detailed steps:
Step 1: Launch and sign in iTunes with your Apple ID that have iTunes purchase music. Then click "Songs" at the sidebar. If you cannot see a sidebar, click View> Show Sidebar.

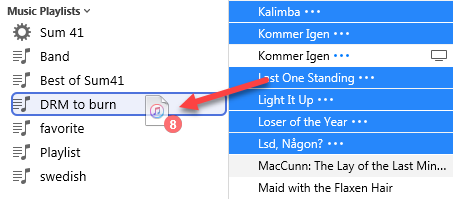
Step 2: Create a playlist and drag songs that you want to burn to CD into this playlist. To do so, just right click below the Music Playlists and click "New Playlist". Then use "ctrl/command + click" to select songs that you purchased from iTunes store, and drag them into the newly created playlist.
- If you have a large library, you could make use of sorting by "kind" to quickly distinguish protected songs from other type such as Apple Music or uploaded. Right click on the bar above your songs list (where you see with Name, Artist, and Album), and click to check "Kind" and "iCloud Status".
- You can burn up to 70-75 minutes of songs to one CD-RW (though it might claim to be capable of 80 minutes). Make sure songs you drag into the waiting-to-be-burned playlist won't exceed that length.
- You cannot burn songs from Apple Music, i.e., songs made available to you on a subscription basis where you pay a monthly fee and have access to its entire library.
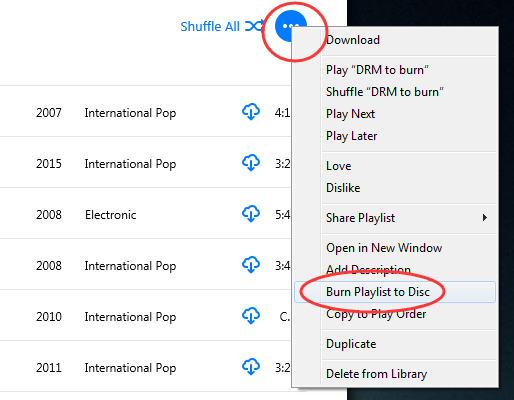
Step 3: Insert your CD into the drive to burn songs. Hit newly created playlist, and click the three-dot icon. In the drop-down menu, click "Burn Playlist to Disc". Make sure to check "Audio CD" in the pop-up window, click "Burn"
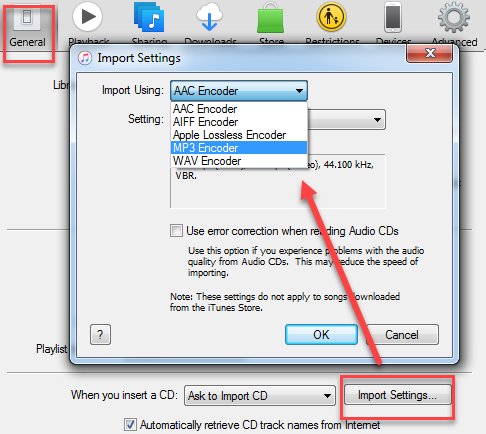
Step 4: When the burning is done, you shall be able to see the content on the CD and import music from CD to your library. iTunes convert music to AAC by default, if you want to have MP3 version, go to edit>preferences>general> import settings, and choose MP3 Encoder.
Step 5: Format the CD and repeat step 2-4 to burn another 70-some minute of songs and rip them into iTunes library.
Step 6: Select iTunes folder when you upload songs from local drive to Google Play Music.
- For Window users, go to C:\Users\Administrator\Music\iTunes\iTunes Media\Apple Music.
- For Mac users, go to Finder>Users folder>Your user name>Music folder>iTunes.
[Easiest Solution] Unlock iTunes DRM Music with a Simple Click – Also Works for Apple Music DRM Removal is One Click Away: Auto Convert M4P to MP31-click Auto Solution
How to transfer songs from iTunes to Google Play in the easiest way? DearMob iPhone Manager offers a 1-click DRM removal solution. Follow the steps below to upload DRM-laden tracks to Google Play.
DearMob iPhone Manager - An Easy iOS Tool to Manage Apple Music and More Files
- Unlock your purchased music for you to enjoy everywhere
- Extract music, photos, videos, books from iPhone to your drive
- Smart built-in to convert files into mainstream formats with 1-click
- Manage iPhone the way you interact with Windows and Android system


Follow the steps below to remove DRM from Apple music.
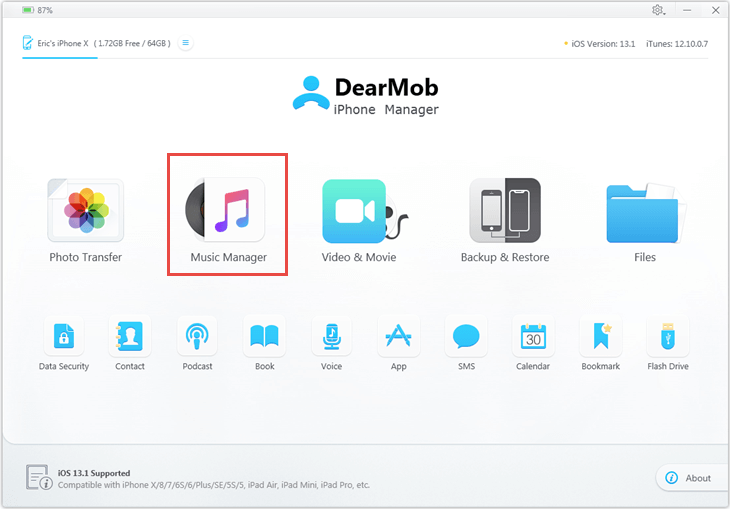
Step 1. Plug-in your iPhone, iPad or iPod, launch DearMob iPhone Manager, and go to Music module.
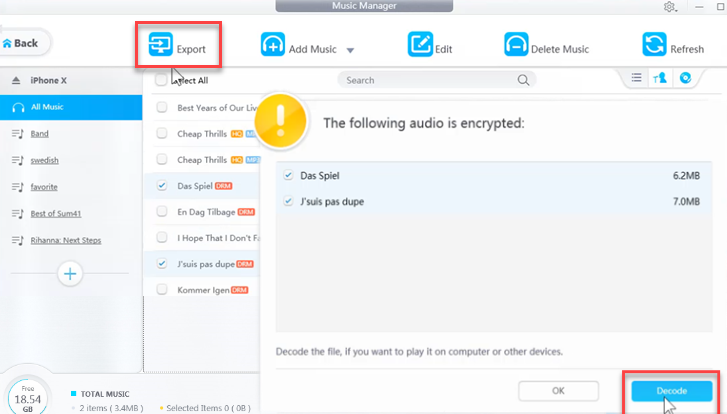
Step 2. Select DRM music and click "Export", or simply drag songs to any folder you want.
Step 3. Hit "Decode" to remove DRM from Apple music (.m4p), and you just wait while DearMob iPhone Manager converting m4p to mp3.
Step 4. Folder containing unlocked DRM music will pop out, and then you can transfer songs from iTunes to Google Play via chrome extension or Google Play Music Manager.
- Default path for unlocked DRM music on Windows: C:\Users\Administrator\Music\DearMobiPhoneManager
- For Mac users, go to Finder>Documents>DearMob>unDRM.
- You can also rip DRM from TV shows, movies and digital books in a similar manner.
Music File Types on Different Platforms
Google Play Music |
Apple Music |
iTunes Music |
|---|---|---|
| Support adding:MP3(.mp3), AAC(.m4a), WMA (.wma), FLAC (.flac), OGG (.ogg), ALAC (.m4a), DRM protected AAC (.m4p)* |
Protected AAC (.m4p) | iTunes Plus:AAC(.m4a) Protected AAC (.m4p) ** |
* Some .m4p files can’t be uploaded according to Google Play Music Help.
** All songs now for sale in the iTunes store are the so-called iTunes plus songs, i.e. AAC encoded files with .m4a extension that are DRM free music, while songs you purchased before 2009 could be DRM-laden music.
Final Words:
Besides converting M4P to MP3 to fix "can't transfer iTunes purchases to Google play", DearMob iPhone Manager is also an easy-to-use iOS tool to backup iPhone, transfer photos, videos, songs, contacts, podcast, calendar events, bookmarks from iPhone to computer and backward, with smart built-ins to set custom ringtone and auto covert incompatible formats. Guess what, you can also unlock DRM videos and digital books with this tool.