
Transferring photos from iPhone to USB flash drive, external hard drive, SSD regularly is a good practice. It helps you to free up iPhone storage, and save a copy of the precious pictures as a backup, in case of phone damage or other incidents.
After testing all the existing methods, we round up 8 ways to transfer photos from iPhone to flash drive without computers or with one (Windows or Mac). You can navigate to the method that best suit your scenario.
1. Transfer Photos from iPhone to Flash Drive in the Easiest Way -Using DearMob iPhone Manager
The quickest and easiest way to transfer photos from iPhone to flash drive is to use DearMob iPhone Manager.
Recommend by leading tech publications 9To5Mac, Cult of Mac, PCWorld, and TechAdvisor, this iPhone Management tool offers the most convenient and stable way to transfer photos, videos, contacts and 15+ file types.
Let's see how easy it is to transfer iPhone photos to a flash drive:
Preparation: Connect iPhone to computer and launch up DearMob iPhone Manager.
DearMob iPhone Manager supports both wired connection and Wi-Fi connection.
If you haven't installed DearMob iPhone Manager yet, click the buttons below to download it:

Step 1. Go to Photos section and select all the photos you want to transfer.
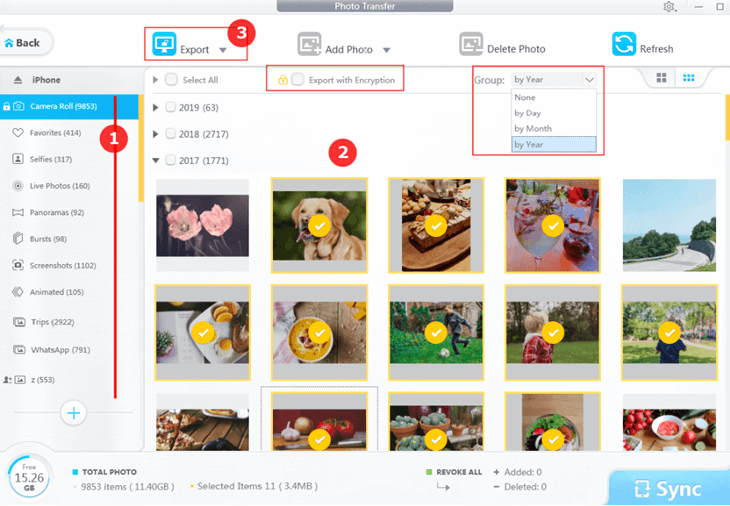
Step 2. Click Export to send the photos to the computer.
Bonus Tips:
1. You can preview photos by album and photo type, such as Selfies, Screenshots, Live photos, Hidden album, Recently Deleted album, Bursts, Panorama, etc.
2. Photos in Hidden Album will not show up in the Camera Roll section, which is very handy as you don't need to manually exclude sensitive photos when exporting Camera Roll photos in 1-click.
Step 3. Insert the flash drive and move those iPhone photos to the flash drive.
- Transfer Photos from Messages app: Besides camera roll photos, you can also view photos embedded in the Messages app and export them to computer.
- Transfer Files among iPhones, Flash Drives, Computers: You can transfer videos, music contacts card, digital books, voice memos, documents, spreadsheets, ringtones, and many other files. From iPhone or to iPhone.
- Back up iPhone Fully or Selectively: DearMob iPhone Manage can store multiple backup files, or selectively back up only the files you want.
- Convert Photos, Videos, Books, Contacts to achieve maximum compatibility: HEIC to JPG, Contact's VCF card to PDF/TXT/HTML, EPUB to PDF/TXT/HTML, etc.
- Create Custom Ringtones: set your favorite songs as ringtones and alert tones. Trim off the best part.
2. How to Transfer iPhone Photos to Flash Drive Using Windows DCIM Folder
Using DCIM folder to transfer iPhone photos to flash drives is a common practice. When connecting iPhone to the computer, Windows explorer will detect the DCIM folder in your iPhone storage and show it. It is the same way when you connect a camera to a computer to transfer photos.
If your DCIM folder is empty, you can unplug iPhone and re-plug again, make sure the iPhone screen is unlocked. Should the error persists, or DCIM folder is not showing on PC, troubleshoot with these methods.
Step 1. USB-connect iPhone to the computer, unlock iPhone screen and hit Trust this computer when prompted.
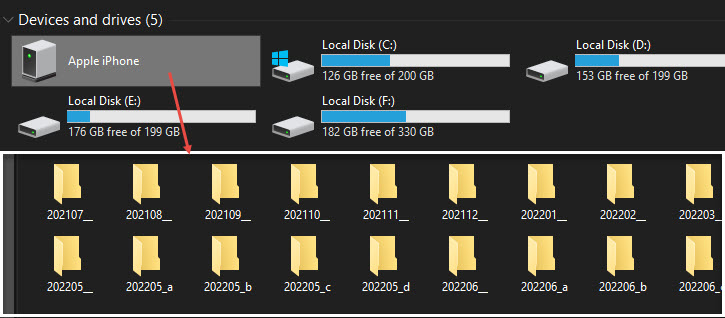
Step 2. Open Windows Explorer (Click This PC, or simply open any folder).
Step 3. Go to Apple iPhone > Internal Storage > DCIM.
Step 4. Copy the folders to the flash drive.
If you only want to transfer iPhone photos to a thumb drive, without copying videos from the camera roll, you can right-click to group by type, and copy photos only.
Note:
DCIM folder in iOS and iPadOS used to conform to the 8-digit naming convention, namely, 100APPLE or 100CLOUD. The folders goes on with 101APPLE, 102APPLE and so on. Now it breaks into folders by month.
3. How to Transfer Photos from iPhone to Flash Drive Using Windows 10/11 Photos App
The default Photos App on Windows 10 and Windows 11 is built-in with an importing feature. After copying photos from iPhone, you can then send these photos to a flash drive. It works like this:
Step 1. Connect your iPhone to the computer via the USB.
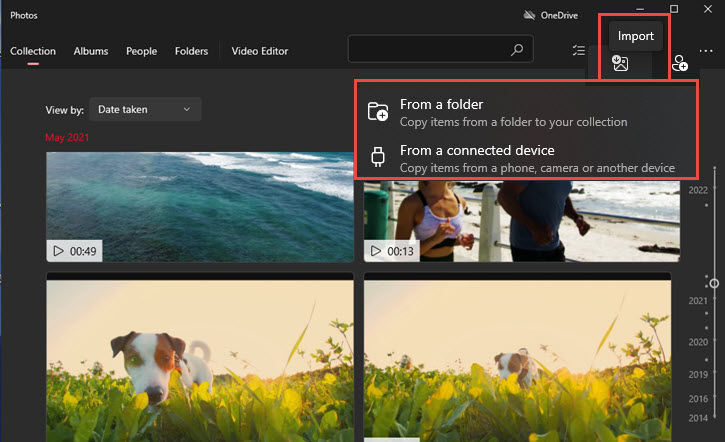
Step 2. Go to Windows Start menu to launch up the Photos App.
Step 3. Click the Import icon and choose to import from a connected device.
Depending on your Windows version, the position of the Import icon may vary on the interface.
Step 4. Wait for the Photos App to scanning photos on your iPhone.
Should the process fail, make sure to unlock your iPhone screen, and keep the device connected to the computer the entire time.
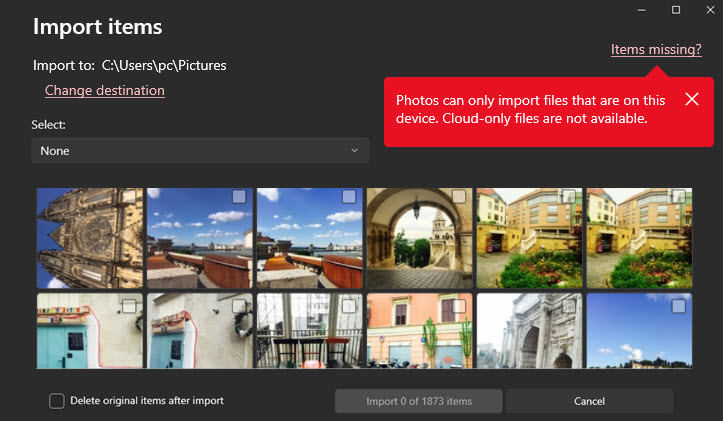
Step 5. Select the photos to import.
It will show the number of photos and videos available to import.
These files are stored on your device, in the camera roll. Those on the iCloud won't show up in the scanned result.
- You can change the importing path to the desired destination folder.
- If you prefer to delete iPhone photos after importing, you can tick the box in the bottom left corner.
Step 6. Click the Import button.
Step 7. Insert the flash drive stick and copy the iPhone photos to the flash drive.
4. How to Move Photos from iPhone to Flash Drive Using AutoPlay on Windows 7
If you are on Windows 7, you can also use the AutoPlay feature to import iPhone photos before transferring to a flash drive.
Step 1. Connect iPhone to computer and unlock home screen.
Step 2. The AutoPlay window will pop up, hit Import pictures and videos.
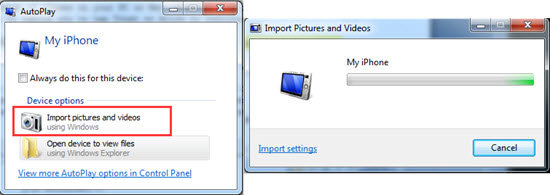
Step 3. Manage Import Settings and start to copy iPhone photos to the computer.
Step 4. With all the photos saved to PC, you can then transfer them to a flash drive.
5. How to Transfer Photos from iPhone to Flash Drive on Mac - Photos App and Finder
Since macOS adopts a library-based mechanism to store and view iPhone photos, there are two options if you want to transfer photos from iPhone to a flash drive on Mac:
I. Transfer the entire Photos Library to the external hard drive or flash drive.
I. Transfer the entire Photos Library to the external hard drive or flash drive.
Note:
You will not see the photos as individual files, as they are sealed inside the library package.
If you want to view and edit the photos on the flash drive, you need to insert that drive to computer and redirect the Photos app to refer to that library.
II. Transfer photos to the flash drive.
It would be the same experience as transferring files and documents to a flash drive.
Option 1: Detailed steps to transfer iPhone photos to flash drive by moving the Photos Library:
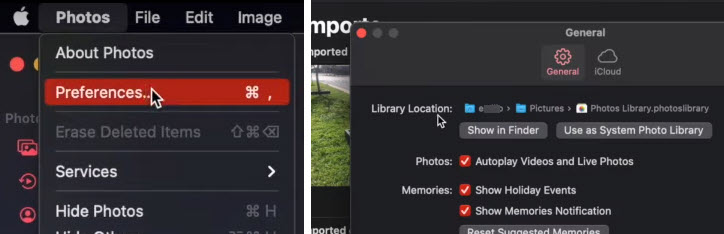
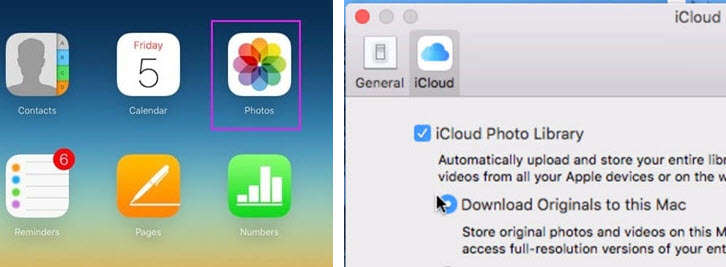
Step 1. Connect iPhone to Mac and open up the Photos App.
Step 2. Click Import New Items to import photos from iPhone to the Mac Photos Library.
Step 3. Copy the Photos Library.
The Photos Library is stored in the Home Directory > Pictures by default. You can check its location by clicking Photos from the menu > Preferences > Library Location. See screenshots below.
Step 4. Insert a flash drive and paste the Photos Library (the database) to the flash drive.
According to Apple Support, Mac supports either APFS or macOS Extended (Journaled) format. Therefore, make sure the Thunderbolt or USB drive is formatted accordingly.
You can check the format information in the Disk Utility App.
Step 5. Relink Mac Photos App to the new Photos Library located on your flash drive/hard drive.
With the Photos Library folder on external storage disk opened, hold down the
Option Key
while launching the Mac Photos App.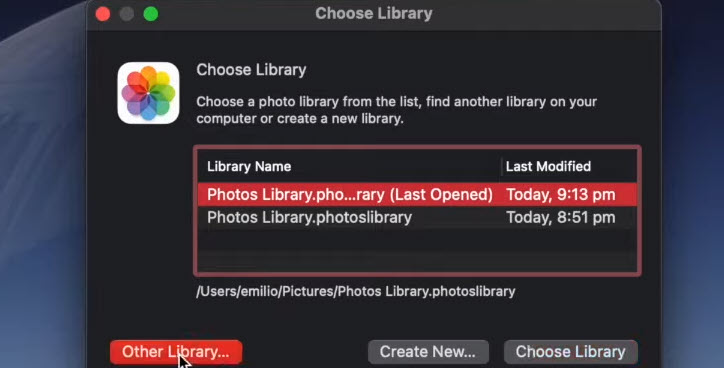
You shall see a dialogue box asking you to Choose Library (see screenshots above). Click the Other Library button in the bottom left corner, and confirm selecting one that's on your external storage drive.
Option 2: Transfer the photos (as individual files) to the flash drive.
Step 1. Open Finder and go to Pictures from the home directory.
Step 2. Unpack Photos Library.photoslibrary by right-clicking (or Control+Clicking) on it, and hit the Show Package Contents option.
The actual photo files are stored in ~/Pictures/Photos Library.photoslibrary/resources/derivatives/masters
After clicking Show Package Contents option, you can then go to resources > derivatives > masters to see the photos.
In fact, the Photos Library is sealed to prevent easy access to it for security concerns. It is recommended to copy-paste instead of cut-paste the photos out of the Mac Photos Library, so that you won't accidentally corrupt the library.
Step 3. Copy and paste the iPhone photos to the flash drive.
6. How to Download Photos from iPhone to Flash Drive Using iCloud
Besides wired methods, you can also use Cloud services such as the default iCloud syncing.
The general idea is to sync iPhone photos to the iCloud server, and then you can visit iCloud from your Windows or Mac computers, download the photos, and paste them to a flash drive.
See detailed steps below:
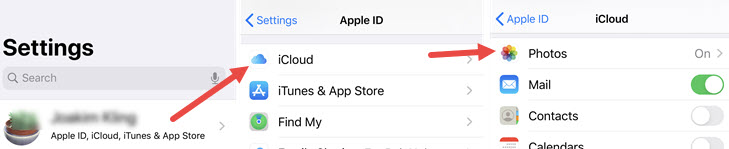
Step 1. Enable iCloud syncing for iPhone Photos.
On your iPhone, go to Settings > [Your Account] > iCloud > Photos, and toggle on iCloud syncing for it.
Step 2. Visit iCloud.com to download synced photos to your computer.
You can also use iCloud desktop app on Windows or turn on iCloud Photo Library in Mac Photos app.
Step 3. Copy and paste to transfer iPhone photos to the flash drive.
7. How to Move Photos from iPhone to Flash Drive via AirDrop
If you have a Mac, you can AirDrop photos from iPhone to Mac, and then connect the flash drive to Mac to copy photos.

Step 1. Transfer photos from iPhone to Mac via AirDrop.
Step 2. Go to the Downloads folder to find the AirDropped photos.
Step 3. Connect the flash drive to Mac and copy and paste those imported photos.
AirDrop is a seamless way to transfer photos, but sadly it doesn't work on Windows computers. The feature only works inside the Apple ecosystem, among iPhone, iPad and Mac.
8. How to Transfer Photos from iPhone to Flash Drive without Computer - Using External USB Storage Directly
The idea of connecting USB directly to iPhone is workable, with two options:
- You can use a special USB stick made for iPhone, which comes with a lightning connector and the regular USB connector on two sides.
- If you are on iOS 14, 15, 16 or higher, you can use the corresponding official Adapter to connect (in theory) any flash drives and SSD.
Here are detailed explanation and tutorials for the two options.
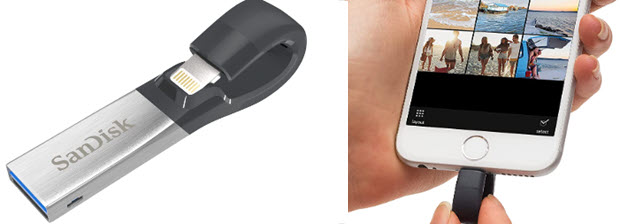
Option 1: Use a Special USB Drive
For the convenience of demonstration, we use SanDisk iXpand as an example here. Its alternatives works in similar ways.
Step 1. Connect SanDisk iXpand to the lightning port of iPhone.
Step 2. Install the SanDisk iXpand app: iXpand Drive from App Store.
Step 3. Open up the app, and go to COPY FILES.
Step 4. Select photos you want to copy from iPhone camera roll, and paste it to the iXpand flash drive.
External USB storage for iPhone as such offers more or less similar features. Besides copying photos, there are options to back up iPhone, back up photos every time you plug it in, and delete photos to free up storage after importing to the flash drive.
There are potential trade-offs despite the convenience.
- Connection Error: You may be prompted with the "This device is unsupported" message. The possible causes are: 1) the flash drive is not MFi-certified (Made for iPhone); 2) You are connecting a SSD that needs more power which the lightning port cannot provide.
- Lightning port occupation: since the lightning port is occupied, you won't be able to charge iPhone when transferring large quantity of photos. It may result in power-off while the transferring yet finished.
- Third-party App: Since you need the accompanying app to explore and transfer photos to the flash drive, there are risks when the developer stops updating the app. Each brand of the external USB storage has its own proprietary apps to interface the exchange of data.
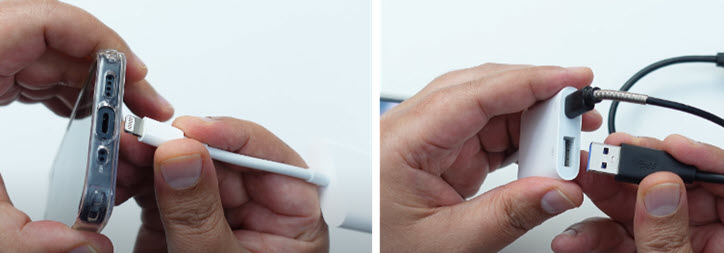
Option 2: Using Apple's Adapter and Files App
The adapter works as a bridge between the lightning port on iPhone and your storage device: be it a USB stick, external hard drive, SD card, etc.
Apple offers three kinds of adapters for different scenarios:
- USB Camera Adapter
- Lightning to USB 3 Camera Adapter
- Lightning to SD Card Camera Reader
In this tutorial, we will be using the Lightning to USB 3 Camera Adapter to connect the external flash drive.
The Lightning to USB 3 Camera Adapter can be powered with a USB power adapter. This allows you to connect USB devices with higher power requirements, such as external hard drives, to iPhone.
Step 1. Take your Lightning to USB 3 Camera Adapter, insert the lightning connector to iPhone, and plug in the flash drive to the adapter.
Step 2. Go to Files App on iPhone, and swipe right to access the flash drive.
Step 3. Create a new folder on the flash drive to better organize the incoming photos.
Step 4. In the Photos app, select photos you want to transfer and click the Share icon. Hit Save to Files.
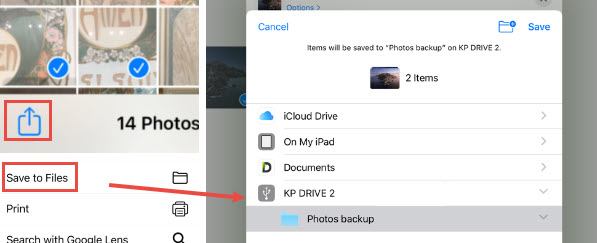
Step 5. In the pop-up window, you shall see the flash drive under the usual "iCloud Drive" and "On My iPhone" option.
Step 6. Transfer photos from iPhone to flash drive by selecting the previously created new folder.
Note: As you can see, with the Lightning to USB 3 Camera Adapter, you can connect it with any flash drive with the USB connector. Just make sure that the USB are formatted in FAT, FAT32, exFAT (FAT64), or APFS.
Wrap Up
| Method | Transfer Speed | Require Computer | Organize Photos | Ease of Use |
|---|---|---|---|---|
DearMob iPhone Manager |
 |
Yes |
By date/month/year |
|
Windows DCIM Folder |
|
Yes |
By month |
|
Windows Photos App |
|
Yes |
N/A |
|
Windows AutoPlay |
|
Yes |
N/A |
|
Mac Photos App |
|
Yes |
Yes |
|
iCloud |
|
Yes |
Yes |
|
AirDrop |
|
Yes |
N/A |
|
Directly Connect USB Drive |
|
No |
Depending on Disk App |
|


Free download DearMob iPhone Manager to transfer photos to flash drive: