How to Retain Geotagging Information When You Transfer Photos
By Joakim Kling - Last Updated: Contact Author
It's a pain to lose geotags on photos. Those location data help us remember where a picture was taken, be it tourist attractions, camping spots, or some less-traveled hiking places that we have pinned for a future revisit. If you fear losing location data when moving photos across devices, read on to find out how to retain geotagging information.
Superfast iPhone Backup Software
DearMob iPhone Manager, a slick and simple tool for you to transfer photos from iPhone to iPhone/Mac/Windows PC and retain geotagging information. It keeps intact photo metadata and transfers photos without quality loss. 1-Click to encrypt your sensitive photos with military grade algorithm. Quickly spots pictures saved from Snapchat, Instagram, VSCO, Snapseed and other apps, transfers your social memories to computer for a backup.
DearMob iPhone Manager
• Preserve photo metadata;
• Retain photo geolocation;
• Backup camera roll, videos, folders;
• 100% clean & green, no malware.

Quickly Scan which Section Tackles Your Problem:
What is Geotagging?
In simple terms, geotagging refers to the process of adding geographical information to media files. This geographical information, or GPS data, is embedded in your media files, pinpointing the location the photos or videos were snapped. If the location service on your iPhone is enabled for the onboard camera, you will have geotag photos on iPhone every time you take a snap or record a video.
How to Export Photo while Preserving Geotag when Back Up Photos to Computer
GPS data, together with other metadata, such as timestamp, ISO speed, picture size, is embedded into your photo. Meaning it is device independent and will not be stripped when you transfer photos from iPhone to your computer, unless you fiddle with some options for the computer to remove metadata from photos.
Also read: How to Backup iPhone Before iOS Update >>
If you are not sure whether you have set up somehow for the computer to remove iPhone picture location, you can rest assured as DearMob iPhone Manager will not erase geotag upon exporting. Follow these steps to transfer photos from iPhone to Mac/Windows PC:
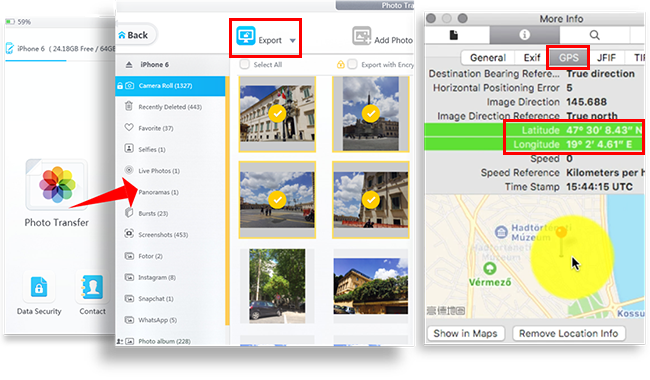
Step 1: Connect iPhone with DearMob iPhone Manager > Go to Photo Transfer.
Step 2: Select photos you want to back up to computer and click "Export".
For Windows Users: right click the photo and hit on properties to see GPS data.
For Mac Users: right click the photo in Photos app > Edit with Preview > Hold down command key and "I" to bring out Inspector, then you can see all the metadata including GPS data of a particular photo.
Please note, some apps do remove location data when you share photos for privacy concerns.Apple Mail, iMessage, Facebook's Messenger, and WhatsApp does gobble up image meta data in my case. If geolocation is a concern for you, do check out whether a particular app erases geotag of a photo before sending out pictures and exposing your whereabouts.
How to Retain Geotagging Information when Transferring Photos from iPhone to iPhone?
Fearing the worst scenario of geolocation data missing and being unable to see all the amazing places you have visited on map? It is possible to export photo while preserving geotag on another iPhone using DearMob iPhone Manager, which never erase your location data when transfer photos from iPhone to iPhone. With its built-in photo management utility, you can free up your old iPhone storage by exporting photos to windows PC and Mac, and sync geotag photos to your new iPhone while retaining location data of photos and view them on map in Places album.
For visual thinkers, click to watch the tutorial on how to retain photo geotags >>
For text readers, assuming you already export photos from iPhone to computer, here is the workflow to sync photos to new iPhone while retaining geotagging info:
Step 1: Connect iPhone with DearMob iPhone Manager> Go to Photo Transfer > Click "+" to Create album.
Step 2: Import target photos into newly created album and click Sync.
Step 3: On your iPhone, go to Photos app > Albums.
Step 4: (Very important). Tap open newly-added album(s), select all photos and click that arrow-square-up icon at bottom left, swipe right on the bottom bar and you should be able to see a "Duplicate" icon, tap on it.
Step 5: (Optional). Since you have duplicated photos, you will have two copies of each photo, which could be annoying. As iPhone Photos prevent you from deleting photos synced from computer, go to Photo Transfer on DearMob iPhone Manager and delete these photos. Now you have only one copy of each photo with geotag. And they appear on the map!
Note: By design, iPhone does not allow user to edit photos synced from computer (unless you duplicate it), nor will the photos app reads GPS location of synced photos and display it on maps (even if those photos have GPS data embedded in EXIF info, which can be viewed on a computer). The workaround is to duplicate the photos and voila, you can see them appearing on the map in Photos app.
Why Choose DearMob iPhone Manager?
As one of the best iPhone backup software 2019, DearMob iPhone Manager is designed for the best of iOS file transfer, backup and management. Give your iPhone a full backup and restore backup file to new iPhone with 1-Click, so as to protect your phone against bad situations such as being stolen, dropping into water and system crash down. Take a total control of your iPhone and selectively backup photos, videos, music tracks, documents, contacts, books, voice memos, text messages, calendar events and more. Enjoy two way syncing and transfer multimedia to iPhone for playback and review on the go.
How to Geotag a Photo using iPhone?
According to the Camera App explanation, "Photos and videos will be tagged with the location where they are taken", which should be an automatic process if you grant Camera app access to your iPhone location services.
If your iPhone doesn't records the location every time you take a photo, it's probably because you haven't toggle on location services for the Camera app.
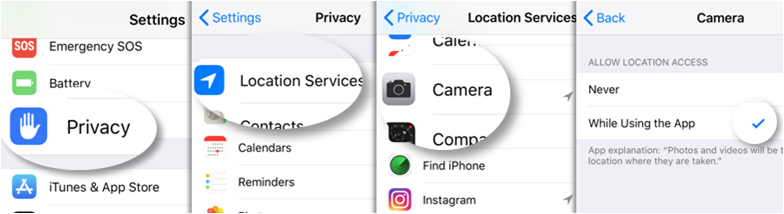
Follow these steps to turn on iPhone photo geotagging:
Step 1: Go to Settings > Privacy.
Step 2: Select Location Services.
Step 3: Tap on Camera > While Using the App.
Bonus: According to the Photos app explanation, "Your location is used to create Memories from photos that were taken nearby". For those who asked Why Photos app stop create Memories, now you know the reason. Check whether the Photos app has access to location services:
Go to Settings > Privacy > Location Services > Photos, enable location services for Photos app and you can enjoy those auto-generated Memories in Photos.
How to Make iPhone Pictures Appear on the Map in the Photos App?
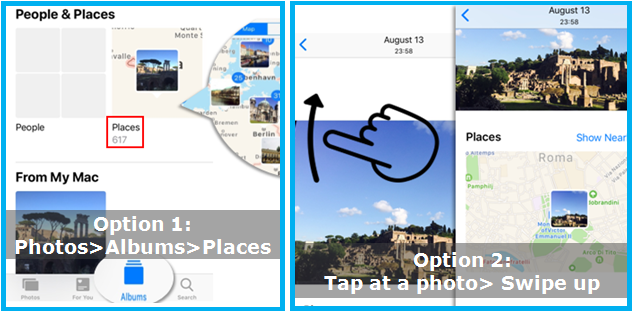
If the pictures you taken are assigned with GPS information, then the iOS Photos app will automatically group these photos into the "Places" album. There are two options to see the pictures on a map:
Option 1: Go to Photos app > tap Ablums > scroll to "Places" album and tap open it.
Option 2: Tap at a single photo in your camera roll, swipe up and you will see the particular photo pinned on map with street name, city, etc.
Wrap-up
Hope you find solution here to retain geotagging information when you transfer photos from iPhone to iPhone/Windows PC/mac. Because it's cool to view geotagged photos on map and have fun exploring where you have been on this planet. DearMob iPhone Manager strives to preserve your valuable memories stored in the form of photos, videos, voice and sounds, text messages and more. Give it a try and start to enjoy an ever more intuitive solution to transfer and backup all kinds of iOS files you can think of.