
In most cases, you may take relatively simple methods such as "a restart" or "the recovery mode" to solve many problems of your iPhone. However, when the case becomes more challenging, for example, when your iPhone is disabled due to many wrong passcode attempts or the system update process fails and becomes soft-bricked, DFU mode can often rescue it. DFU mode is not something you use every day, but it becomes useful, even necessary, in certain situations.
So, what is DFU mode on an iPhone, and how do you use it? This article will explain everything you need to know.
Important: A DFU restore erases everything on the iPhone. Before attempting it, always ensure you have a backup of your iPhone, either through iCloud or DearMob iPhone Manager.
What is DFU Mode on iPhone
DFU or Device Firmware Upgrade mode is a special low-level state of an iPhone. It's an immutable part of the Boot ROM and burned into the hardware during chip fabrication.
In DFU mode, the iPhone does not load iOS or even the usual iBoot bootloader. It stays in a blank state waiting for instructions from a computer. This is why your iPhone's display stays completely black.
Although you can manually enter DFU mode and restore your iPhone from any state while in this mode, it was never really intended as an end-user feature. Apple doesn't surface DFU mode as an option in settings or standard support guides.
How to Put iPhone in DFU Mode
Entering DFU mode requires a specific sequence of button presses and holds. The exact method varies by iPhone model due to different hardware buttons.
No matter the model, you'll need to connect the iPhone to a computer with iTunes or Finder via USB before starting. A USB-C cable may not work. To avoid possible failure, try using a nomal USB cable and a USB-to-USB-C adapter.
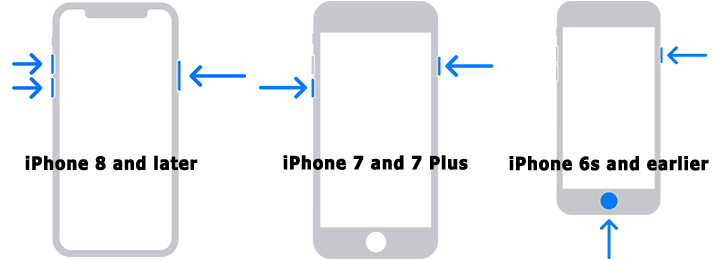
On iPhone 8 and later
- Press and quickly release the Volume Up button.
- Press and quickly release the Volume Down button.
- Press and hold the side button until the screen goes black.
- Quickly press and hold the Volume Down button as well, so now Side and Volume Down are held together.
- After about 5 seconds, release the Side button but continue holding Volume Down until your computer recognizes the device.
On iPhone 7 and iPhone 7 Plus
- Hold down the Side button and the Volume Down button together for about 8 seconds.
- Release the Side button while continuing to hold Volume Down until the device is detected by iTunes/Finder.
On iPhone 6s and earlier
- Press and hold both the Home and the Top (or side) buttons simultaneously.
- After about 8 seconds, release the Power button but continue holding Home until your computer detects the device.
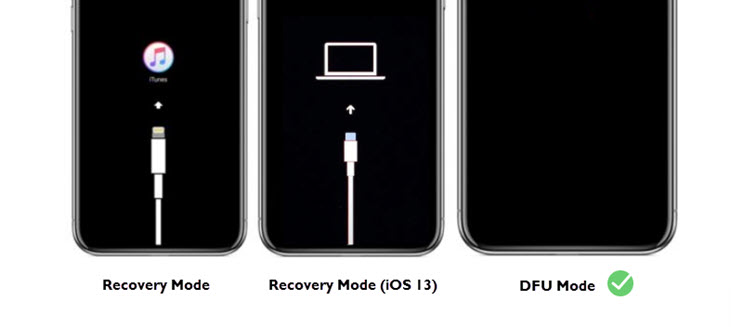
If done correctly, your iPhone's display stays completely black in DFU mode. That's your clue that you are in DFU and not just standard recovery. iTunes or Finder will prompt that it has detected an iPhone in Recovery Mode, even if it is actually in DFU Mode – Apple's software doesn't explicitly distinguish the two in the alert.
If you see the "Connect to iTunes/computer" graphic, it means you accidentally entered the standard recovery mode. If the Apple logo appears, you held the Power button for too long, and the phone rebooted. In either case, please retry these steps and adjust your timing.
How to Exit DFU Mode iPhone
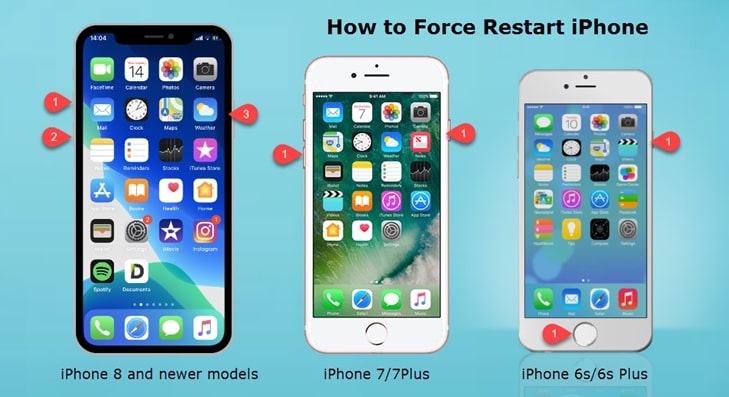
Exiting DFU mode is straightforward. You need to force-reboot the device to leave the state and boot it back to the normal operating mode, or recovery mode if there's an OS issue.
- iPhone 8 and later: Quickly press and release Volume Up, then press and release Volume Down, then immediately press and hold the Side (Power) button until the Apple logo comes up.
- iPhone 7 and iPhone 7 Plus: Press and hold the Side (Power) and Volume Down buttons together until the Apple logo appears.
- iPhone 6s and earlier, and iPhone SE (1st gen): Press and hold Home and Power buttons together until the Apple logo appears.
Once you see the Apple logo, the device is no longer in DFU mode. If the phone's OS is functional, it will boot up normally. If there is an issue with iOS, the device may go to the recovery screen or require a restore.
When to Use DFU Mode
Here are some common use cases and scenarios where DFU mode is employed:
- Your iPhone is soft-bricked, stuck on the Apple logo boot loop, or has a black screen;
- You forget your passcode, or the device is disabled due to too many wrong passcode attempts;
- Your iPhone isn't recognized in recovery mode or cannot be restored through normal means;
- You want to update your iOS device from an expired beta version;
- You want to downgrade the iOS version as the current version has caused some problems for your device to function;
- You want to perform device acquisitions when trying to extract data from a locked device;
- You are trying to jailbreak or un-jailbreak your iOS device.
Warning: Do take DFU mode as your last straw. Do not venture into this mode unless the recovery mode doesn't work. If you decide to use DFU mode to mend your problems, all your data will be wiped out and there are potential risks of damaging your device or violating the warranty, especially when you use it to downgrade the iOS or jailbreak your device.
How a DFU Restore Works
When an iPhone is in DFU mode, the device runs only the most minimal code and gets ready to communicate with the restore software (iTunes or Finder) via a special protocol. Here's a simplified breakdown of what happens during a DFU restore on the technical level:
- Connection and Detection: In DFU, the iPhone identifies itself to the computer as a device in recovery mode. The restore software will report "iPhone in recovery mode detected". At this point, the phone's screen is black and it's awaiting external input.
- Uploading Low-Level Bootloaders: The restore software will first send a small piece of code called iBSS to the device over the USB connection. This iBSS file will initialize hardware and prepare for the restore. Once iBSS runs, the phone is still not fully "booted," but it has enough logic to accept the next stage.
- Transition to iBEC and Restore Mode: After iBSS, the computer sends iBEC, which brings up USB and memory, and then puts the device into a restore mode (RAM disk) environment. The screen may still be black or might now show the Apple logo, depending on the stage.
- Sending the Firmware Components: iTunes or Finder will then send the ramdisk, kernel, and system image from the chosen iOS IPSW file to the device. Before installation, the device will verify the signature (APTicket). If the firmware is not valid, such as tampered or unsigned, the restore will fail at this stage.
- Installation and Reboot: Once verified, the restore ramdisk will erase the device's flash storage, partition it, and begin writing the new iOS system to it. It also updates other firmware, such as the baseband, if required, and may update calibration data or low-level settings. During this phase, you'll typically see a progress bar on the screen.
If everything goes smoothly and the DFU restore process completes, the phone will reboot into the newly installed iOS and start up to the "Hello" setup screen.
DFU Mode vs Recovery Mode
The DFU restore and Recovery mode restore converge on the same process. Both end up loading a ramdisk, checking the firmware signature, and flashing the OS. The key difference is in how we get there: DFU mode starts from a more fundamental state.
From a technical standpoint, a DFU restore is often considered deeper than a recovery restore. DFU mode is a raw, hardware-level state used when the normal boot process can't start at all. It reloads the device's firmware components, such as the bootloader and radio firmware, even if they were intact. Recovery mode is a slightly higher-level mode used when the software iBoot detects an issue or when manually invoked for repairs. They operate at different levels.
In practice for our end users, DFU mode is not designed for casual use and is hard to enter. The timing of button presses is tricky, and there's no confirmation on the device's screen. However, it's relatively easy to enter the Recovery mode. Each model has a simple button sequence, and the device gives on-screen feedback.
In summary, use Recovery Mode for standard restores or updates. But if Recovery Mode fails or the device is in a more bricked state, DFU mode is the next step.
Final Words
Hope this instruction has provided you with thorough information of DFU mode and when and how to enter it on your iOS or iPadOS devices, especially iPhone. But there's one more thing you need to keep in mind: don't risk taking the DFU mode unless other modes such as the "recovery mode" won't work, in case your device will be damaged.