It is highly recommended to transfer videos from iPhone to Mac or PC when your iPhone is overloaded and needs alleviation. Movies, TV shows, or video recordings are indeed the chief culprit making iPhone storage space shrink sharply, but you just can't abandon these clips because of their heavy bodies. So, transferring videos from iPhone to Mac/PC is a win-win strategy to set your iPhone 16/15/14/13/12/11/XS/8, etc. for free as well as retain any iPhone video you cherish.
1. Transfer Videos from iPhone to Mac via DearMob
Best Way to Transfer Videos from iPhone to Mac (Cinematic Mode Videos Supported)
No need for WiFi and no storage limitation, DearMob iPhone Manager can help move videos from iPhone to Mac and PC as many as possible without any data loss. Plus, it allows you to import videos of various formats downloaded from YouTube, Dailymotion, Facebook, etc. to iPhone 16/15/14/13/12/11/XS/8, etc, and auto-convert to iOS-compatible clips upon transferring.
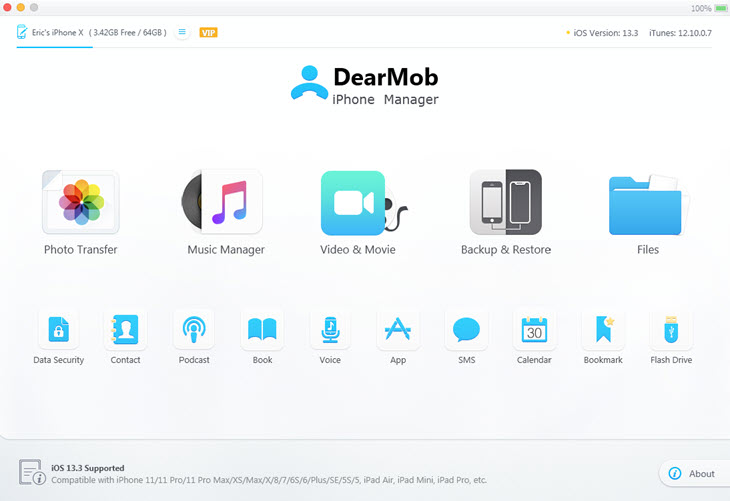
Step 1. Install and launch DearMob iPhone Manager on your Mac, and plug in your iPhone.

Step 2. Click on the Video & Movie icon to access the video transfer screen.
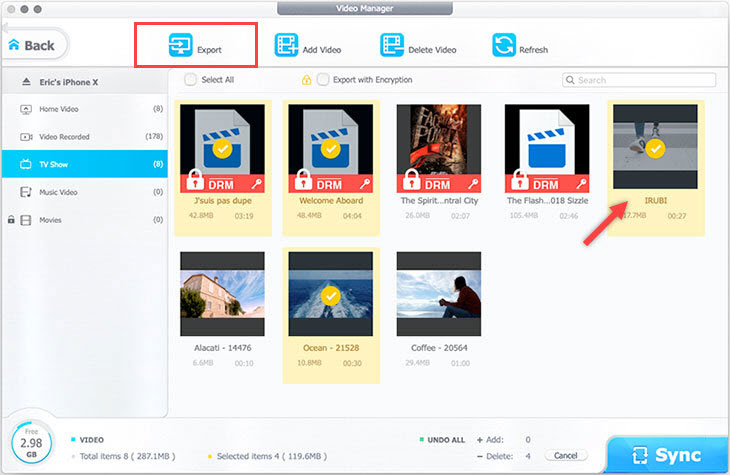
Step 3. Choose the videos you want to move to Mac and then click Export on the top bar.
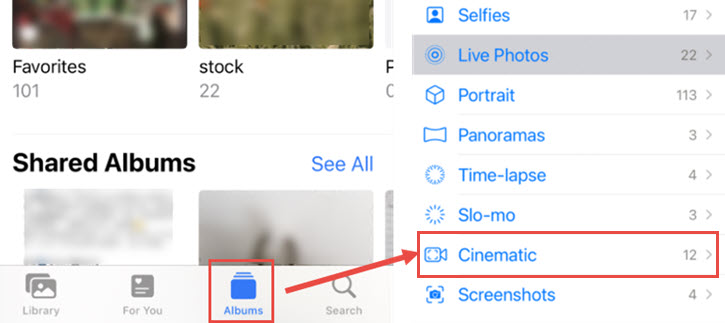
Transfer Cinematic Mode Videos from iPhone to Mac/Windows
To transfer Cinematic Mode videos with rack-focus effect, you need to make sure the video is processed automatically on iPhone.
1. You can check it in Photos app > Album, and under the media type section, you will find one called "Cinematic". Inside that album, it will notify you if the cinematic mode video is not processed. Tap on it to process the video.
2. Also, you can unplug your iPhone and re-connect it to the computer, unlock the screen and there will be a pop-up asking whether you want to process the video, and confirm processing it.
Tips: Besides copying videos from iPhone to Mac/PC, DearMob iPhone Manager can also download videos to iPhone and batch delete the unwanted video clips. From the main UI, you can discover that this software tool does not restrict itself to video management. Photo transfer, music management, and iPhone-to-iPhone backup are also shining and useful features that all of you iPhone users can make use of. It is easier than ever to manage iPhone messages, contacts, notes, books, DRM contents, etc with DearMob iPhone Manager as well. Explore more here>
2. Import iPhone Videos to Mac via Photos App
If you have iCloud photos library turned on, both on your iPhone and Mac Photos app, videos shall automatically show up on Mac.
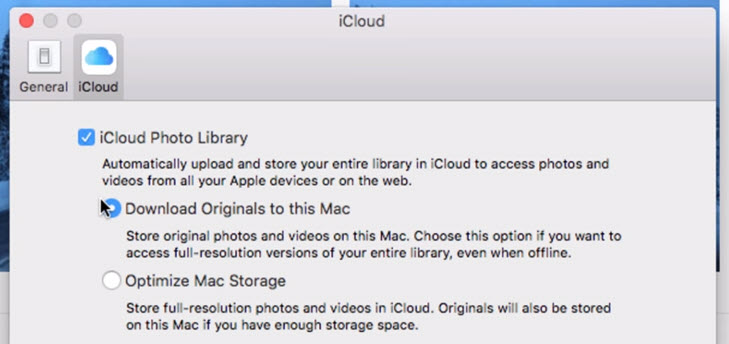
Toggle iCloud syncing: Mac menu > System Preferences > iCloud.
Videos will automatically show up in the Photos app, and you won't need to import them again.
However, if you don't have enough iCloud storage, or simply have no desire to store media with the cloud thing, you can manually import videos from your iPhone to the Photos app.
Step 1. Connect your iPhone or iPad to Mac.
Step 2. Launch the Photos app if it doesn't pop up automatically.
Step 3. Click your device from the sidebar, and select the folder or albums to import.
Step 4. Import all new videos or selectively import desired ones.
You can find the videos in Last Import and in the Videos album.
If you want to copy iPhone videos to a normal folder, instead of in the library, method 1 is more suitable, or you can use the good old Image Capture utility.
3. Download iPhone Pictures to Mac via Image Capture
Image Capture utility regards your iPhone as a camera device. It has access to camera roll photos and videos. It allows you to download iPhone images to a folder, bypassing the Photos library.
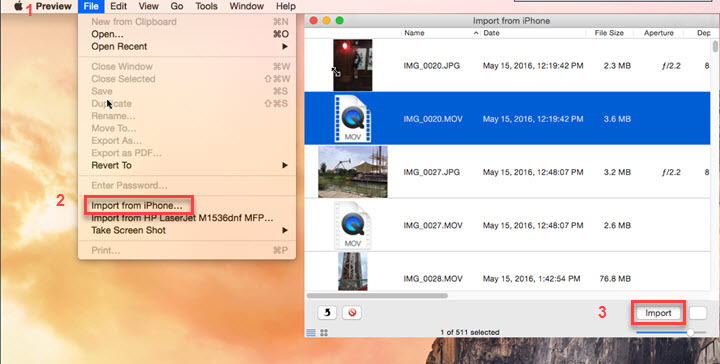
Step 1. Press down command + space to call out the spotlight search, and type Image Capture. You can also go to File > Import from iPhone.
Step 2. Select MOV and MP4 files, and specify the destination folder.
Step 3. Click Import.
What's the difference between the Photos app and Image Capture?
In terms of transferring videos, the largest difference is where the video will be stored after importing.
Using the photos app, videos and images are stored in the Photos Library. When you first use the Photos app on a Mac, you will be asked to create a new library to use. Since then, imported videos and photos are stored in that Photos Library. Manually moving media files may lead to Library corruption.
With Image Capture, you can download iPhone videos to any folder, and access, copy, and edit them as you do with co
Another difference lies in the integration with other apps. If you like editing videos in iMovie, the videos in the Photos app are available right within the media browser.
Note: Some users reported an Image Capture error that leads to photo loss. If you choose to erase photos after importing, there are risks that Image Capture erases the photo before downloading, and fails to copy pictures to Mac.
4. Transfer Videos from iPhone to Mac via AirDrop
AirDrop is the best way to send one short video from iPhone to Mac. If you select multiple files or large 4K videos, you will see a "preparing" notice, and it is quite unstable.
Step 1. Launch Finder from your Mac, and click AirDrop on the sidebar.
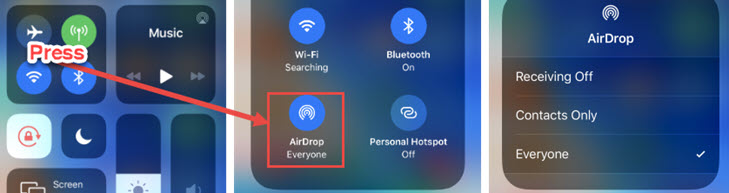
Step 2. In the AirDrop area, click Allow me to be discovered by: Contacts Only or Everyone.

Step 3. On your iPhone, swipe up the control panel, and firmly press the middle part in the Wi-Fi/Bluetooth section.
Step 4. Turn on AirDrop.
Step 5. Find the video you want to send to Mac, click the Share icon ![]() , and AirDrop to your Mac.
, and AirDrop to your Mac.
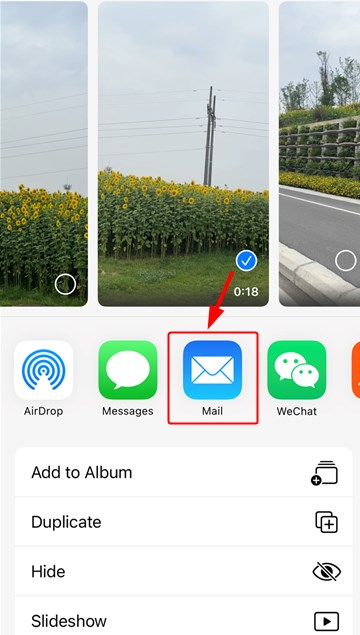
5. Transfer Videos from iPhone to Mac via Email
How can videos be transferred wirelessly from an iPhone to a Mac? If you're delivering a few small-file-size video files, using your email would be a decent choice. As a result, there is a limit on the number of files you can attach or the overall size of the list of attachments you can create. Because it will depend on your email service provider, you will still need to verify this for yourself.
Then all you have to do is to send your videos from your iPhone to Email. Open the Photos app on your iPhone, select the videos you want to send, then tap the share button in the left-bottom corner and tap on the Email app to transfer videos from iPhone to Mac. You may use Gmail or your iOS device's built-in email program to send videos from your iPhone to your Mac for free.
Wrap Up
| Method | Video Type | Connection | Note |
|---|---|---|---|
DearMob iPhone Manager |
Camera roll videos, iTunes purchases, movies, videos in messages, Files, VLC, etc. | Wired |
Option to convert live photos to videos |
Mac Photos app |
Camera Roll videos |
iCloud syncing or wired transfer |
Videos will be imported to the Photos Library |
Mac Image Capture |
Camera Roll videos |
Wired |
Videos will be imported to folders |
AirDrop |
Videos with Share |
Wireless |
Best for small size videos |
Camera Roll videos |
Wireless |
Best for one or two videos |
Free download DearMob iPhone Manager: