How to Downgrade iOS to Lower Version without Data Loss
By Joakim Kling - Last Updated: Contact Author
If you cannot put up with beta iOS problems, and want to downgrade iOS, the common practice is to install IPSW file. IPSW file is the raw iOS firmware that stores everything for your device to function.
Usually, you can get IPSW file via iTunes when updating to new iOS version. It is auto-installed with iTunes. As for iOS downgrade, you have to manually download IPSW file through websites that host old firmware versions. This post offers step by step tutorial to downgrade from iOS 13 to iOS 12 as an example, and downgrading from iOS 14 to iOS 13 works similarly.
Downgrading iOS comes with risks. There are chances that your iPhone might enter into bootloop or become completely irresponsive. Then you will have to put iPhone into recovery mode, or a step further into DFU mode.
Before we jump into the details, it is important to backup iPhone/iPad to computer or iCloud before rolling back to previous iOS versions.
iOS 13 Downgrade Tutorials
Part 1: Use IPSW to Revert to Previous iOS Build
Many posts online told you to choose Update after Shift-click Restore iPhone and select an IPSW file, they are wrong.
Previously, when you are downgrading from iOS 12 to iOS 11, you can hit Upgrade button and select IPSW file to install. It would downgrade your device to lower version but still keep existing data on your iPhone. Now with iOS 13, that method no longer works based on our test.
You need to hit Restore instead. With this kind of downgrading mechanism, after you hit Restore and select IPSW file, data created on iOS 13 will be removed. When you are back on iOS 12 once again, you can select pre-iOS 13 backup file to restore it to your downgraded iPhone, or recover data from iCloud backup. However, there is another workaround that involves changing ".plist" file to keep data created on iOS 13, please read on.
Preparations:
• A Mac or Windows Computer
• Latest version of iTunes on Windows/macOS 10.14 and earlier
• Or Finder on macOS 10.15
• IPSW file matching your device
• Make sure to toggle off find my iPhone
Warnings:
• Stay your iOS device connected to computer the entire process. If the downgrade process is interrupted, you will need to put your iPhone/iPad into Recovery mode and restore it again.
• It's better to use USB cable that comes with the device, instead of using any third party USB cable that may make the process unstable.
Step 1. Back up your iPhone on iOS 13 and make an archived backup for later use.
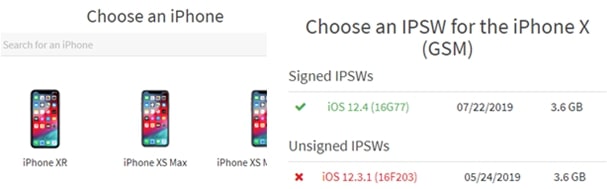
Step 2. Download the iOS 12 IPSW firmware that matches your device. In this case, we are using signed iOS 12.4 IPSW file, and the device is iPhone X.
You can go to ipsw.me or other site that you trust, choose corresponding device and select an IPSW file to download.
Step 3. Launch iTunes, if you are on macOS 10.15, launch Finder.
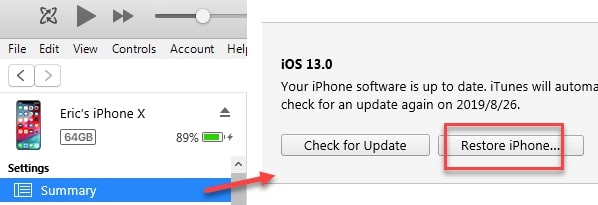
USB-connect your iPhone or iPad, hit the device icon in iTunes on top left and go to summary section. If you are using Finder, click the device icon and pair your iOS device.
Step 4. Hold down SHIFT (on Windows) or OPTION (on Mac), and at the same time click the Restore button.
Step 5. Choose the downloaded iOS 12.4 IPSW file, click Open and hit Restore. The device will start restore, remember never unplug the USB cable.
Step 6. Here is the tricky part to downgrade iOS 13 while preserving data. Go to backup folder, locate the info.plist file, open it with text editor such as xcode, atom etc, find the line of <string> and change 13.0 to 12.4 (match your IPSW version).

• For macOS Catalina: preferences > device > right click the iOS 13 backup file > show in Finder.
• Or you can directly go to backup file location: ~/Library/Application Support/MobileSync/Backup/
• For Windows users, backup files are located in:
Windows 10: C:\Users\(username)\Apple\MobileSync\Backup
Windows 7:C:\Users\Administrator\AppData\Roaming\Apple Computer\MobileSync\Backup
Step 7. When your iOS device complete restoring, you will see on iTunes or Finder the option to set up your iPhone as new or restore from backup file. Now select that iOS 13 backup file and hit Restore.
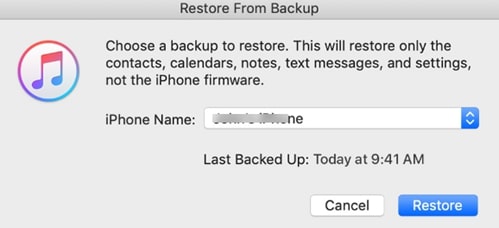
• Generally, backup of higher version cannot be restored to backup file of lower version, but as we have changed the plist file, it tricks iTunes to think it is restoring an iOS 12 backup file.
• We succeeded with iPhone X, and saw other tech bloggers test with iPhone XR and succeed. However, there is no 100% guarantee for it to work.
• If you stop at step 6, you will have your iPhone reverted to iOS 12.4 but all data is gone, that's how Restore works, just as you are using a new iPhone. But you can restore data from iCloud backup, or if you have a backup file on computer before upgrading to iOS 13, you can restore iPhone from that backup file.
Part 2: Downgrade from iOS 13 with Recovery Mode (When IPSW Method Fails)
Normally, installing IPSW file will help you to roll back to the previous iOS version. If you accidentally unplug iPhone, or the device somehow stuck in the process, you will need to put iPhone into Recovery mode.
How does it work?
When iTunes detects that your iPhone is in recovery mode, it will download and install the latest stable version of iOS, while erasing everything on your iPhone. When you made up to the greeting screen, you can then choose to restore data from iCloud or offline backup files made by iTunes or other iOS backup tools.
Step 1. USB-connect iPhone to computer and launch iTunes, unlock the screen and tap trust to authorize this computer.
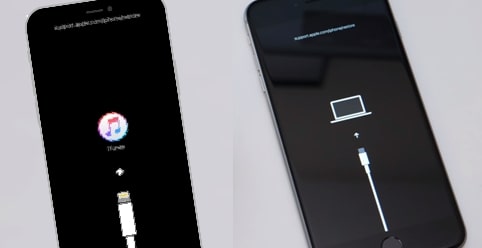
Step 2. Press certain button combinations to put iPhone/iPad into recovery mode.

• iPhone 8 and later models/newer iPads without home buttons: press and release the volume up button, do the same to the volume down button, then firmly press and hold power button for 10 seconds until you see the recovery mode screen (when you press power button for 2 seconds or so, you will see the slide off screen, keep holding the power button for a longer time to enter recovery mode).
• iPhone 7/7Plus: Press and hold the Volume up and power button for as long as you see the recovery screen identified by a "connecting to computer" icon.
• iPhone 6 and iPads with home buttons: Press and hold the Volume up and home button at the same time and don't release before you see the recovery screen.
Notice: make sure to stay your device connected to iTunes the entire process. Actually, buttons to press as instructed below is the same as you force restart/hard reset iPhone/iPad (without USB-connect to computer), and when the device is connected to iTunes, it will put the device into recovery mode.
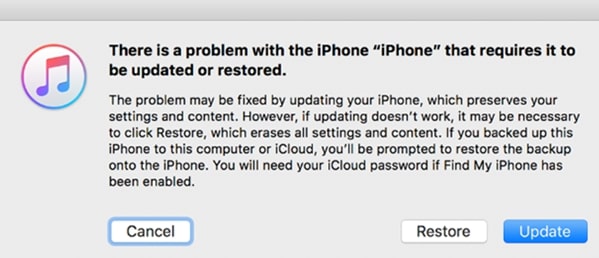
Step 3. Hit Restore and follow instructions and prompts on iTunes. During the process, your device might reboot several times, and iTunes will auto install the latest stable version on your iPhone (thus you have rolled back to iOS 12.x build).
Note:
• If the process goes on for a long time, making your device exists the connecting to computer screen, then you need to restart from Step 2 to Step 3.
• Theoretically, you can hit Update instead of Restore, so that iTunes will not remove existing data on your iPhone while update to the latest stable version. But with iOS 13, hit Update to restore to iOS 12.x (x depending on IPSW version) while keeping data won't work in our test.
Step 4. Then it is as if you have a new iPhone, now you can choose to restore data from iCloud backup, or restore data from previous backup file stored on your computer if any.
Part 3: Downgrade from iOS 13 to Lower Version with DFU Mode
DFU (Device Firmware Upgrade) mode is a step beyond recovery mode. Generally, common users won't come to this stage unless iPhone/iPad is bricked and recovery mode in part 2 won't work.
DFU mode will wipe out your iPhone, and it is tricky to enter into DFU mode as the timing and buttons to press are complicated and device dependent. Please proceed with caution or just take your device to Apple store to seek help from professional personnel.
Step 1: Launch iTunes and pug in your iPhone/iPad.
Step 2: Put your iPhone into DFU mode. The buttons to press depend on your iPhone/iPad models.
Step 3. If your device screen remains black but can be detected by iTunes, it's in DFU mode. If not, you can try repeat Step 2 to make sure you have pressed buttons in right sequence per model.
• If your device screen have a connected to computer icon or to iTunes icon, it means you are in recovery mode instead of DFU mode.
• If your device screen has stayed black but cannot be detected by iTunes, it means your device is just powered off/turned off, not in DFU mode.
Final Words
Have you successfully downgraded iOS and enjoy a stable version on your device? Or you are hesitating to downgrade because you concerned about data created on iOS 13 might be erased after downgrading? Fear not, you can transfer important data from iPhone to computer and later import it back to iPhone on stable version.