There are many reasons to back up iPhone photos. Some do it to keep their photos tidy and organized. Others do it for freeing up the iPhone storage space. However, most of us just want to prevent losing our valuable iPhone photos in the event of a lost or stolen phone or a random glitch in our iPhone system. Our iPhone photos capture unique moments that happen only once in a lifetime, from family vacations to weddings and day-to-day moments. Losing these photos can mean losing precious memories and moments forever. Now the question is how to backup iPhone photos.
Luckily, iTunes and professional iPhone management tools like DearMob iPhone Manager have made backing up iPhone photos locally as easy as walking in the park. Some users also back up iPhone photos on cloud services like iCloud, Google Drive, and Dropbox. When it comes to what is the best way to back up iPhone photos, there is no one-size-fits-all answer to this question. Each way has its unique advantages and disadvantages. In fact, we recommend you use some combination of the cloud and local backup methods. For instance, you can use DearMob iPhone Manager to get a local copy of your iPhone photos while also creating a cloud copy using iCloud.
How to Backup iPhone Photos to PC or Mac
Let's explore a few ways to back up your photos locally to your PC or Mac, which offers fast transfer speeds, lower costs, and increased data security. Additionally, if you use DearMob iPhone Manager to back up your iPhone photos, you can enjoy even more flexibility and convenience.
Use DearMob iPhone Manager
DearMob iPhone Manager is the go-to option for people who want to back up iPhone photos to a PC or Mac computer. With this amazing iPhone management software, you can (selectively) back up iPhone photos to a PC or Mac at once while remaining the original album structure and EXIF data. There is no need to use iTunes or iCloud. You can preview the photos and group your photos by the created date. Moreover, it can back up 10,000 and more iPhone photos at the original resolution within 2 minutes, which is incredibly fast.
- Easily backup photos in one click. No.1 speed
- Backup iPhone photos by album/ date/folder
- Delete, convert, or encrypt iPhone photos, as you need
- Recognize and decrypt purchased media files
- Support HEIC, JPG, Live, RAW, GIF & more formats
- Backup, restore & transfer iOS data in one place

Step 1. Connect your iPhone to the PC or Mac using a USB cable. Unlock the screen.
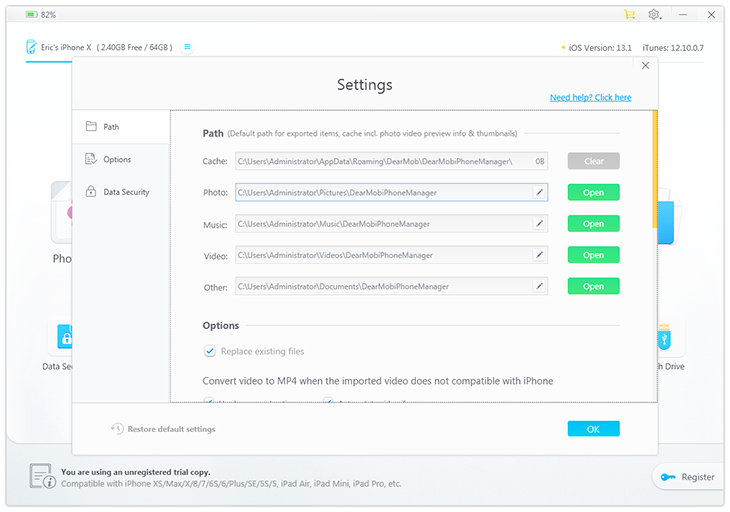
Step 2. Install and launch DearMob iPhone Manager. Click on the Settings icon to choose the folder for saving the backup iPhone photos.
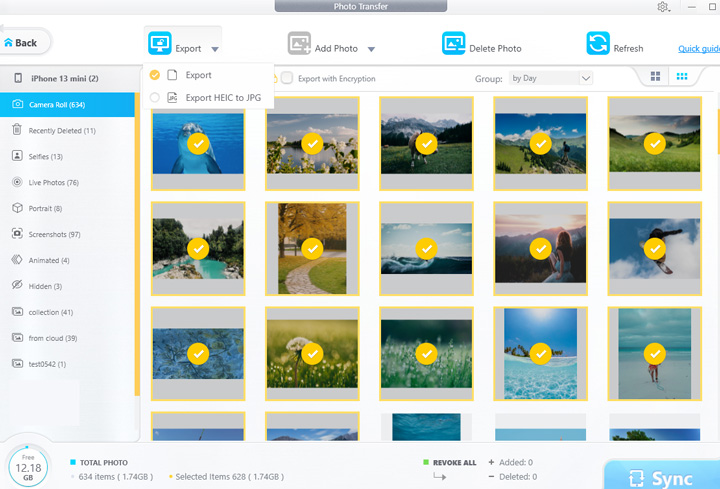
Step 3. Click Photos. Hit Select All to select all photos stored on your iPhone. You can also select certain photos you need to back up. Hit Export. That's all.
Use iTunes
iTunes is the native mobile device management utility for iPhone, iPad, and Mac. Windows users can download iTunes as well. It can back up photos that are captured using the camera of your iOS device to your PC or Mac computer. However, it's important to know a few drawbacks of backing up iPhone photos using iTunes.
- Cannot back up photos that aren't captured with the iPhone camera
- Cannot back up iPhone photos that are already stored in the iCloud
- Cannot back up only the iPhone photos (Must backup all iOS data)
- Not allow you to view or organize iPhone photos on your computer
- Hard to specify the output folder for the backup photos
- Data-loss risk. Overwrite the previous backup and the existing photos
Step 1. Connect your iPhone to the PC or Mac computer using a USB cable that supports data transfer.
Step 2. Install and launch the most recent version of iTunes on Windows or Mac.
Step 3. Unlock your iPhone to ensure iTunes can detect your device.
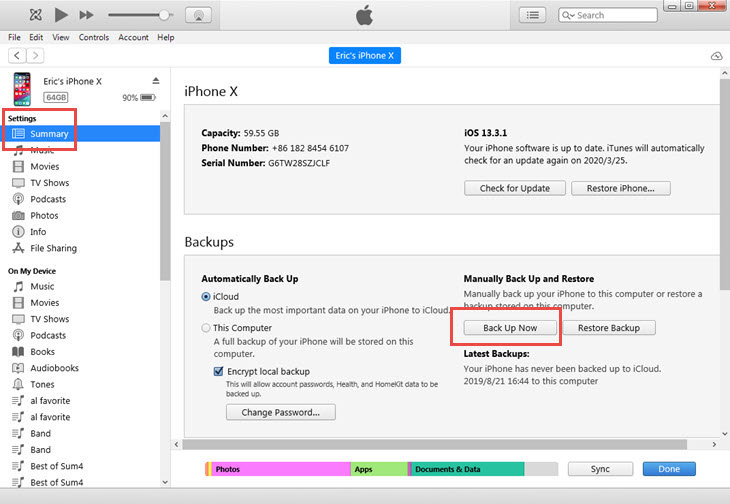
Step 4. Click your device. Choose General, select Backup, and then tick Encrypt local backup. If this is the first time you create an Encrypted backup using iTunes, then you need to set up the backup password.
Step 5. Hit Back Up Now to start backing up photos and other data stored on your iPhone.
Use Airdrop
Airdrop builds a peer-to-peer connection between two iOS devices utilizing Bluetooth technology and allows you to transfer photos, videos, notes, contacts, and more files from an iPhone to nearby iOS devices for backup. If you're using a Mac computer and your devices are within about 33 feet of one another, then airdropping photos from iPhone to Mac is a great idea to back up your iPhone photos. However, backing up iPhone photos using Airdrop is not a perfect solution.
- At the risk of exposing to strangers
- Airdrop works only with nearby iDevices
- Large photos will take a long time to transfer
- Random failure when backing up 4K iPhone photos
- Difficult to sort the backup iPhone photos
Step 1. Swipe up on your iPhone to open the Control Center. Tap the Bluetooth icon to turn on Bluetooth on your iPhone.
Step 2. Go to the nearby Mac, click the Apple button, and then go to the System Preference section. Choose Bluetooth to turn on Bluetooth on your Mac.
Step 3. Select all the photos that you want to back up to your computer.
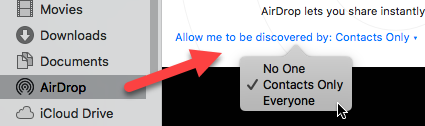
Step 4. Tap the Share icon and then tap the Airdrop icon. Find the name of your Mac and then tap it to start backing up iPhone photos to a computer.
How to Backup iPhone Photos to Cloud Services
Cloud services work like huge virtual filing cabinets that exist entirely on the Internet. They can help you back up iPhone photos without consuming disk storage space. One of the best things about backing up iPhone photos to cloud services is that they can be accessed from any device as long as you have an internet connection. Cloud services unfortunately have some common drawbacks.
- You are dependent on an internet connection to access your iPhone photos.
- Free cloud storage accounts have limited space. You have to pay to get more storage.
- You're iPhone photos are stored by systems that are not owned by you, so they're at risk of being leaked.
Regardless, read on to learn some of the most popular cloud services that you can rely on to back up iPhone photos.
Use iCloud
iCloud is the native cloud storage service from Apple Inc. Each new iCloud user gets 5GB of free storage space to store photos, videos, emails, and data from other iPhone apps that use the iCloud service. You can pay to get more storage space, for example, $0.99/month for 50GB and $9.99/month for 2TB. However, before getting to know how to back up iPhone photos using iCloud, check its disadvantages.
- Not allow you to change the backup location
- Cannot selectively backup iPhone photos
- Cannot backup iPhone photos without Wi-Fi or data traffic
- Overwrite the existing photos and cause forever data loss
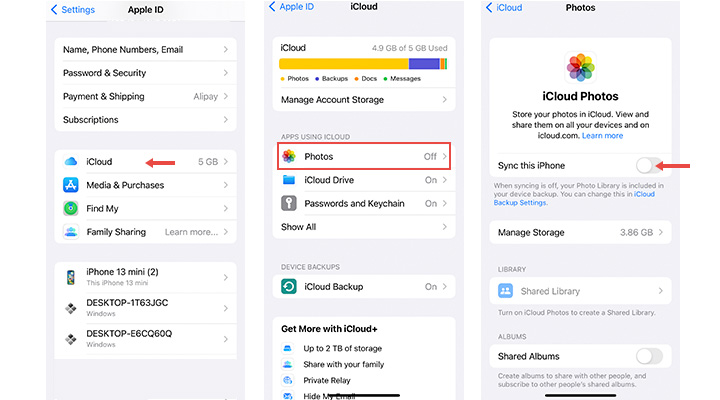
Step 1. On your iPhone, go to Settings, and tap your name.
Step 2. Tap iCloud.
Step 3. Tap Photos and then choose the switch next to Sync your Mac.
Use Google Photos
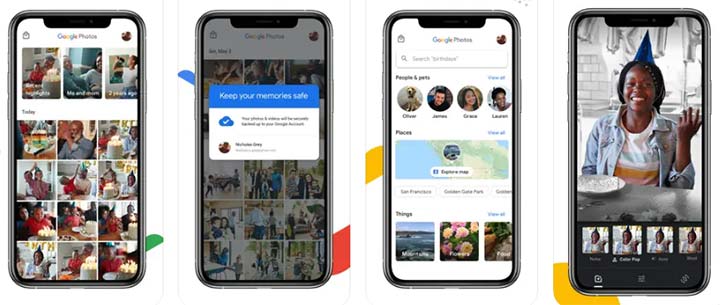
Google Photos is a great option for users who want to get more free cloud storage space. It offers you 15GB of free storage space and allows you to back up specific iPhone photos. Auto backup is also supported. It's also a good pick for users who want to access iPhone photos from Android devices or who may need to immigrate to Android products in the further. Sadly, it has a few flaws.
- Cannot keep the albums you created on iPhone
- Cannot preserve the albums automatically generated by your iPhone
- The photos deleted from Google Photos will also disappear from your iPhone
- It won't keep the original data and time metadata of an iPhone photo
- It may take several days to back up all photos stored on your iPhone
Step 1. Go to Apple Store. Search into Google Photos and install it on your iPhone.
Step 2. Open Google Photos, sign in to your Google account, tap the Settings icon, and then select Backup.
Step 3. Turn Backup on. That's it.
Use Dropbox
As one of the earliest and most successful cloud storage providers, Dropbox has managed to create a stable, safe, and fast cloud service without relying on a well-established ecosystem like other major technology giants. It offers the easiest approach to backing up iPhone photos to the cloud. Better yet, it won't overwrite the local photos, so there is little risk of data loss. However, it also comes with a few downsides.
- 2GB of free storage space only
- Facial recognition is not supported
- Dropbox Camera Uploads won't work if iCloud Photo Library is on
- No automatic album creation
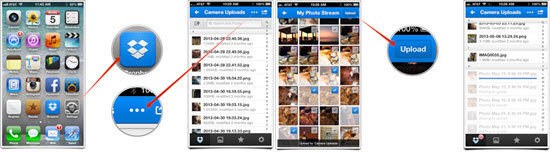
Step 1. Download and install Dropbox from the Apple Store.
Step 2. Open Dropbox, tap the person icon, and then tap Camera uploads.
Step 3. Tap OK to allow Dropbox access to the photos stored on your iPhone.
Step 4. Enable Camera Uploads to start backing up iPhone photos to Dropbox.