How to Manage iOS Voice Memos and Ringtones on Windows
Using iTunes to manage your voice memo ringtone comes with a great risk to mess up your iTunes Library if you don't follow the official instruction properly, and that long-winded tale would always ask you to pay more patience to sit through.
DearMob iPhone Manager is a trusted software to help you to backup, transfer and sort out your voice memos and ringtone in simply a few clicks.
- Flexible Control. Download, delete, and sync iOS voice and ringtones on your Windows.
- Batch Process. Download and delete the voices and ringtones in bulk.
- Customizable. Create ringtones from iPhone songs or any music at your choice.
- Convert to iPhone Format. Automatically convert to iOS foramt like AAC/MP3.
- Safe. Won't copy anything against your will for privacy concerns.
Manage iOS Voice Memos on Windows PC
In DearMob,
You are allowed to batch process the downloading and deletion of voice memos.
1. For iOS 15 and higher:
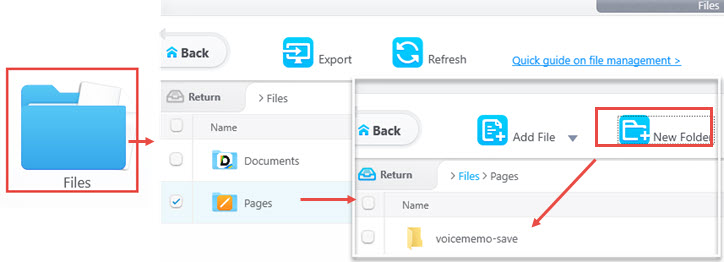
Step 1. Create a custom folder to save the voice memo in File-sharing enabled app.
- To do so, you need to first make sure your device has an iOS or iPadOS app that works with File Sharing. For instance, the Pages, Numbers, and Keynotes apps from Apple support the File Sharing feature.
- Connect your iPhone to DearMob iPhone Manager, and go to the Files module from DearMob main interface. Apps that work with File Sharing will show up here.
- Click on one of those Apps to go inside, and hit the icon to create a New Folder. Taking the Pages app as an example: go inside Files > Pages, create a new folder named as voicememo-save or any other name you prefer.
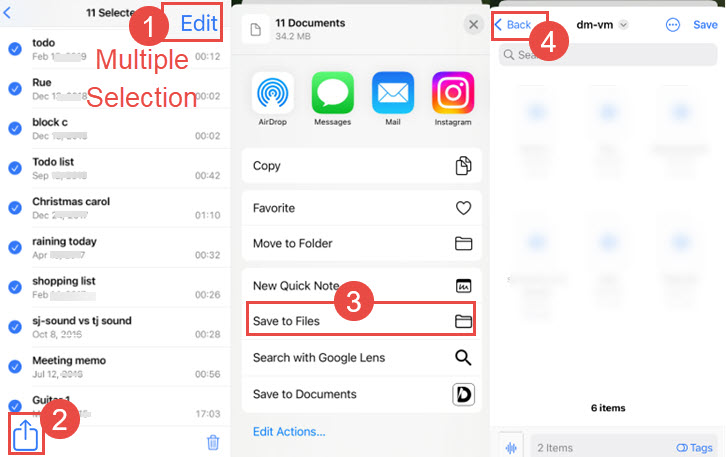
Step 2. Find the Save to Files option on iPhone.
- Go to the Voice Memo app on iPhone, click the Edit option for multiple selections.
- Select one or multiple voice memo recordings, and hit the Share icon at the bottom left corner.
- Now you shall see the Save to Files option, tap on it.
- Then hit the <Back option to go back to the interface where you can select to save "On My iPhone".
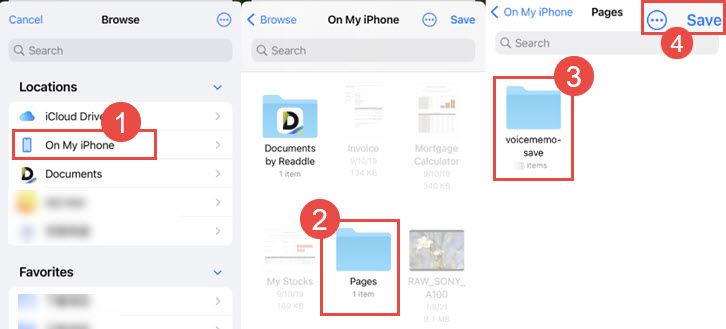
Step 3. Save voice memos to the custom folder created in step 1.
- Tap the On My iPhone option, and find the File Sharing app folder. In this case, it's the Pages folder. Go inside there, and you will spot the custom folder named voicememo-save.
- Hit the Save option to save the voice memos.
Step 4. View and manage voice memos in DearMob iPhone Manager > Files > [the file sharing app you choose] > [custom folder]
- In this case, we will go to Files > Pages > voicememo-save and find the voice memos saved from iPhone.
- You can click the Refresh button to load the newly added files.
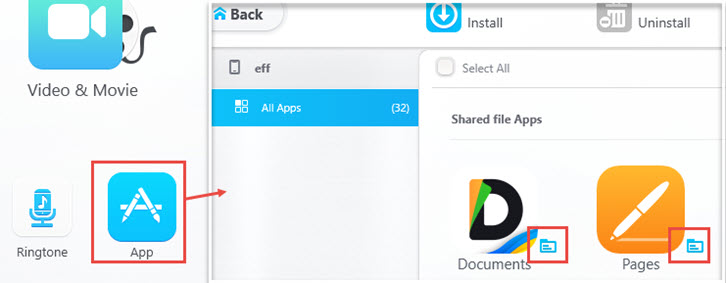
Bonus Tips: Besides go to the Files module from the main interface of DearMob, you can also go to the Apps module from the main UI. Apps that supported the file-sharing feature comes with an folder icon besides their logo.
2. For iOS 14 and lower:
1. Connect your iDevice to the computer with a cable and launch DearMob iPhone Manager.
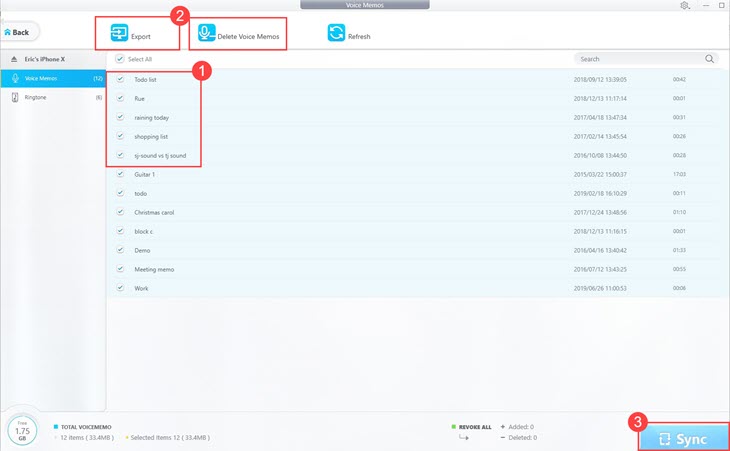
2. Click Ringtone on the main UI for the voice memos management. Select the memos you want to export, and click Export on the top to download to your computer.
3. Tick the memos you want to remove, and click Delete Voice Memos. Then hit Sync on the bottom-right corner of the window to synchronize the deletion to your device.
![]() Tips:
Tips:
- Click Refresh to get real-time voice memos of your iPhone.
- Click Select All on the top-left corner of the window to manage all memos in one take.
- You are suggested to change a new location for your exported memos, otherwise, all files will be stored in driver C by default.
- You can click the red bent-arrow (the end of a voice memo) to undo deleting or click Cancel (next to the Sync button at the bottom) to revoke all deletions.
Manage iOS Ringtones on Windows PC
In DearMob,
You can import M4R, M4A, MP3, AAC, FLAC, WAV, and WMV to create your own ringtone, or directly import prepared M4R ringtone(s).
All musical additions to the device will be automatically converted to AAC/MP3 when they are not compatible with your device.
- Flexible Control. Download and sync ringtones to iPhone in a whoosh.
- Customizable. Create ringtones from iPhone songs or any music freely.
- Easy Process. Easily cut and trim ringtone to a desired length.
- Convert to iOS Format. Automatically convert to iOS foramt like AAC/MP3.
- Safe. Won't copy anything against your will for privacy concerns.
1. Connect your iDevice to the computer with a cable before and launch DearMob iPhone Manager.
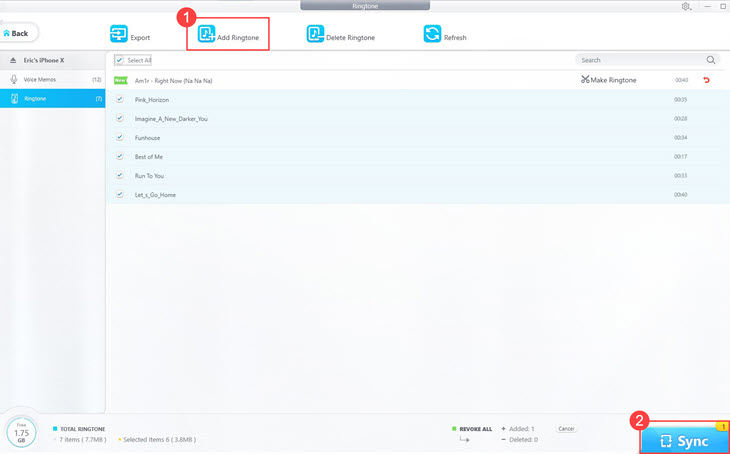
2. Click Ringtone on the main UI for the ringtone management. Select the ringtone(s) and click Export to transfer to computer.
3. To add ringtone to your device, just click Add Ringtone on the top, select the file(s)/folder(s) from your computer and hit Sync on the bottom-right corner to transfer ringtone(s) to your device.
4. Tick the ringtone you want to remove, and click Delete Ringtone on the top. Then hit Sync on the bottom-right to synchronize the deletion to your device.
If you want to customize your own ringtone, you can use the following two ways:
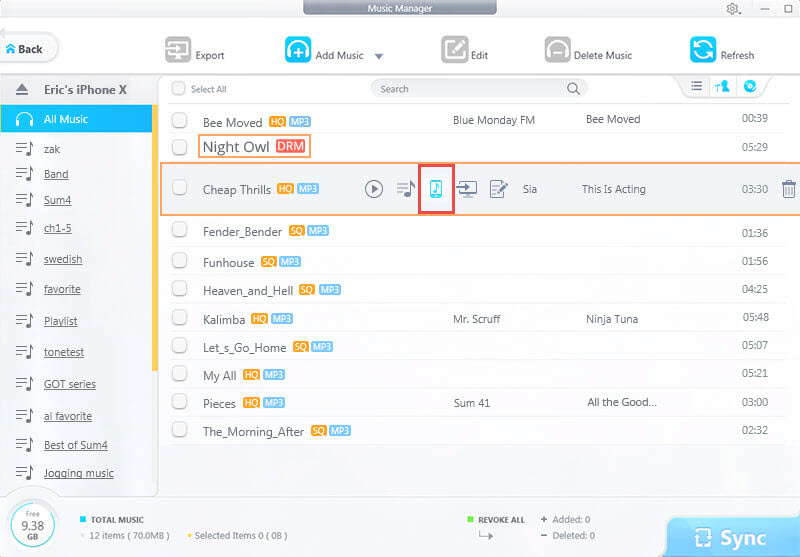
- In the Ringtone panel, click Make Ringtone on the top right corner of the window to start editing.
- Go to the Music Manager, and find the song that you wish to turn into custom ringtone, and click the Make Ringtone to start editing.
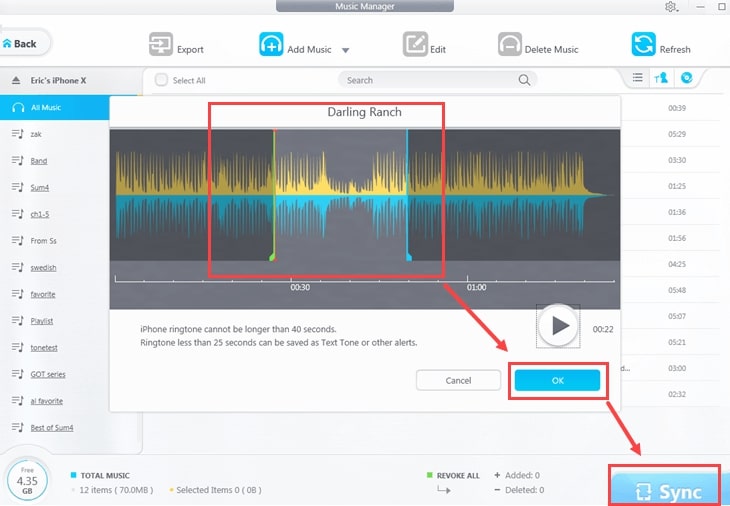
Now in the Ringtone Maker panel, drag the heads to select a part of the audio as your iPhone ringtone, and click Sync button to apply all the settings.
![]() Tips:
Tips:
- The audio within 40s can be used as ringtone, while audio within 15s can be used as alert tone, such as alarm clock and SMS tone.
- Click Refresh to get real-time files of your device.
- Click Select All on the top-left corner to manage all ringtones in one take.
- You are suggested to change a new location for your exported ringtone(s), otherwise, all files will be stored in C drive by default.
- You can click red bent-arrow (at end of a ringtone) to undo deleting or click Cancel (left to the Sync button at the bottom) to revoke all additions and deletions.

 Need Help? Contact >