
Need to transfer photos from Mac to iPhone 16/15/14/13 or older models for enjoying the photos on the go, enriching the iPhone albums, or sharing with an iOS user? You can sync photos to your iPhone via Apple native apps such as iCloud, iTunes, and Finder. Alternatively, you can use third-party apps like DearMob to quickly transfer photos from Mac to iPhone.
Read this post and you will learn how to transfer photos to an iPhone in 7 easy ways. Whether you want to transfer photos from Mac to iPhone without iTunes or you need to send photos from Mac to iPhone with iTunes or other Apple native tools, you will find a workable way for yourself here.
How to Transfer Photos from Mac to iPhone without iTunes/iCloud
iTunes, Finder, and iCloud seem to be good solutions for transferring photos between Mac and iPhone. However, instead of sending the data from one device to another, they're syncing the data. This makes it hard to select certain photos for transferring to iPhone. Worse still, they often cause data loss. Let's assume you need a fast, hassles, and 100% free way to transfer photos from Mac to iPhone, we highly recommend you to try DearMob.

Some Highlight Features of DearMob
- Transfer and manage 15+ file types with or without USB
- Bulk or selectively transfer photos across iPhone, iPad, Mac, and PC
- Support HEIC, JPG, PNG, DNG, live photos, HDR, ProRAW, large 48MP photos...
- Remain the original album structure and picture quality
- Manage iOS content by deleting, editing, and adding items

Step 1. Download, install, and launch DearMob on your Mac. Connect your iPhone or iPad to your Mac with the USB cable.
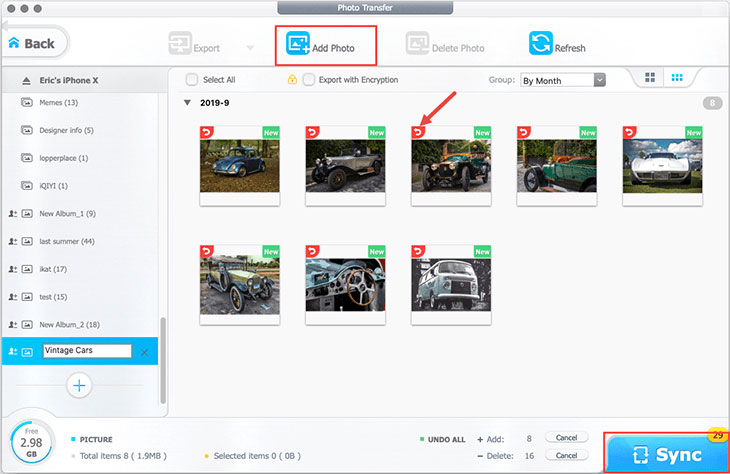
Step 2. Select Photo Transfer on the main interface of DearMob.
Step 3. Drag and drop the target videos from the Mac computer to the program.
Step 4. Hit Sync to start transferring the photos from Mac to iPhone.
How to Transfer Photos from Mac to iPhone with iTunes
If you are on macOS Mojave or an earlier version, you can use iTunes to transfer photos from Mac to iPhone. However, you're only allowed to sync folders or albums that contain photos to your iPhone. That is to say, you cannot select individual photos for transfer.
Note: iTunes might cause permanent data loss.
Before you proceed, please note that iTunes SYNC photos to iPhone, as opposed to ADD photos to iPhone.
Let's say you have 2 photo folders on Mac, named Test1 and Test2, and you sync these two photo folders to your iPhone. You will see them in Photos > Albums > From My Mac: album Test 1, and album Test 2.
Someday, you create Test3 on your Mac and add some photos to Test2 and other photos to Test3. Now you want to sync added photos to your iPhone, here is what will happen:
If you tick Test2 and Test3, then hit Sync. The photos in Test1 will be erased from your iPhone! Instead, you should check Test1, Test2, and Test3 together (even if you didn't add new photos in Test1 this time).
That's because iTunes SYNCHRONIZE what you select every time. If you didn't tick Test1, it will delete that on your iPhone, without warning!
Step 1. USB-connect your iPhone to Mac, and tap Trust when prompted on the iPhone screen.
Step 2. Launch iTunes, click your device, and go to Photos under Summary in the sidebar.
Step 3. Check the box of Sync Photos, and here you have options to sync all photos or photos in selected folders. You cannot select a specific photo.
Step 4. Click Sync.
How to Transfer Photos from Mac to iPhone with Finder
Anyone who upgraded to macOS Catalina or later would know that iTunes is gone. The much-bloated app has been split into the Music app, books app, and Movies app, and its device management function has been integrated into Finder. As a result, when you plug in your iPhone, iPad, or iPod, you shall see the device appear in the sidebar in Finder, just as if you plug in any USB flash drive or external hard drive.
Note: Finder is not for transferring a large number of photos.
If you have tons of photos to transfer, the process can be long. The automatic screen lock might cause expected errors such as disconnecting iPhone and breaking the transfer. (To change screen lock time, go to Settings > Display & Brightness > Auto-Lock, and set it to Never or 5 Minutes.)
Worse more, Finder also SYNC photos to iPhone which may cause permanently data loss.
Step 1. Unlock your iPhone screen, and make sure the screen lock time is not too short.
Step 2. Launch Finder. USB connect your iPhone to Mac, and tap trust on your iPhone to trust this Mac.
If you cannot see your device on the sidebar, unplug your iPhone and try another USB port on your Mac.
Step 3. Click your device, and go to Photos on the horizontal bar.
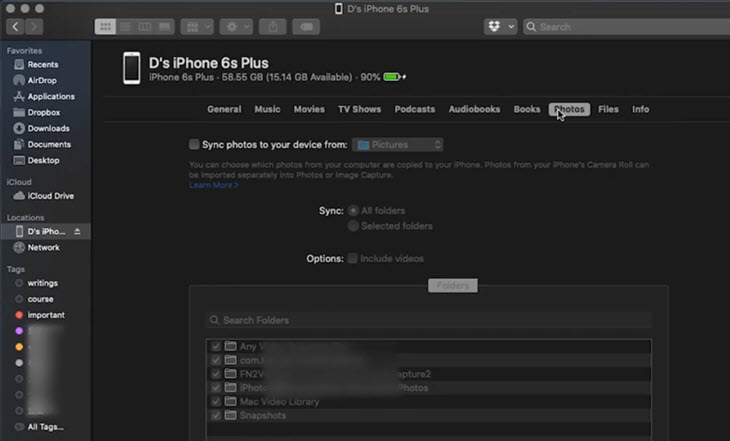
Step 4. Check the box before Sync photos to your device and select:
- Pictures: transfer photos from Finder Pictures folder to iPhone;
- Photos: transfer photos from Mac photos app to iPhone;
- Another folder you created in Finder to store photos.
Note:
If your albums are not in the root in Apple Photos i.e. Albums are grouped under folders in Apple Photos, you might encounter the bug that Finder won't sync photos inside albums.
Step 5. Once you select desired folders and albums, click Sync.
If you check Include videos, your clips will be synced to Apple Photos too. If you prefer the synced videos to be stored in other apps such as VLC or iMovie, you need to sync them in the Files tab (next to the Photos tab).
How to Transfer Photos from Mac to iPhone with iCloud
If you have large iCloud storage or subscribe to the family sharing iCloud storage plan, you can sync a large number of photos from your Mac to the iPhone. It may take a long time for the first time to sync, but from then on, every change you made in the Apple Photos on the Mac will synchronize to your iPhone.
Note: Sync photos via iCloud may cause permanent data loss.
iCloud syncing could be either a blessing or a curse. On the one hand, everything is automatically done, and even if you lost your iPhone or iPad, those precious photos are still in the cloud. On the other hand, when you delete a photo from one device, the deletion will also be applied to other devices.
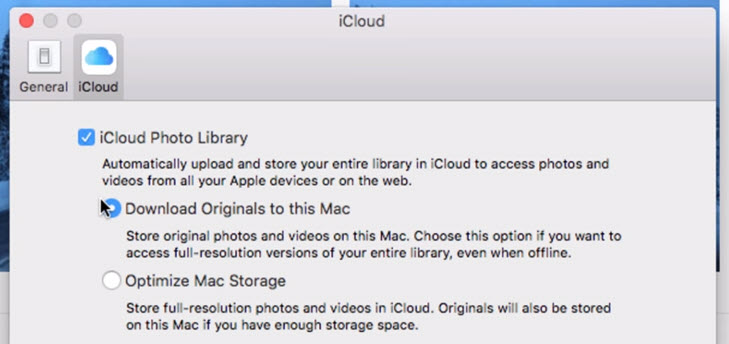
Step 1. Open up Apple Photos on Mac, and go to system > Preferences > iCloud.
Step 2. Tick iCloud Photo Library. Make sure the apple ID on Mac and iPhone is identical.
Step 3. In your iPhone settings, tap your user icon on top, and go to iCloud > Photos to toggle on iCloud Photo Library too.
How to Transfer Photos from Mac to iPhone with Airdrop
If your Mac comes with OS X Yosemite or the later version, your iPhone comes with iOS7 or the later version, and you just need to transfer a few photos, then you can try Airdrop. Follow the below steps to Airdrop the photos from Mac to iPhone.
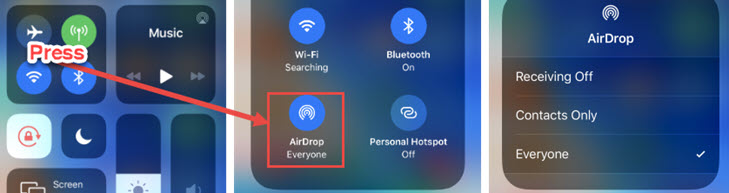
Step 1. Make sure your iPhone has enabled AirDrop receiving. Scroll from the top right to bring down the control center.
Step 2. Press firmly on the top left square box. Tap on AirDrop, and select Contacts Only or Everyone.
Step 3. On your Mac, go to Finder > AirDrop.
Step 4. Drag and drop photos here, and select the icon that indicates your iPhone.
Step 5. On your iPhone, confirm receiving photos from your Mac.
How to Transfer Photos from Mac to iPhone with Browser
Most file explorer apps allows you to Wi-Fi send photos via browser. If you have one of them installed on your iPhone, you can check the user guide to see the browser transfer steps. If you don't have one at hand, you can check out Documents by Readdle. We use it as an example, and other file explorer apps shall work similarly in Wi-Fi transferring.
Note: Browser tool is not efficient for transferring photos from Mac to iPhone.
The transfer speed of Documents by Readdle and other web iOS manager tools depends on the condition of the WIFI network. If the WIFI is poor, then it might take hours to transfer a few 4K photos.
Step 1. Install Documents via Appstore.
Step 2. Make sure your iPhone/iPad and Documents are connected to the same Wi-Fi network.
Step 3. Visit docstransfer.com on your Mac, and enter the right code on your iPhone.
Step 4. Once your computer and mobile are connected, you can add photos into the browser, and view them on your iPhone in Documents.
Bonus: How to Transfer Photos from Mac to iPhone with Files App
Previous methods allow you to transfer photos from Mac to the Apple Photos app on the iPhone. However, some of you might prefer to transfer certain photos to Files or any other file explorer app.
You might want to curate a group of related photos, for instance, the portfolio of illustrators or designers. Or a scan or important document, such as your ID card, certifications, etc.
The default Files app is handy to group your photos and other files, and you can choose iCloud syncing in the Files app, or offline storage.
Copy Mac photos to iOS Files App offline:
Step 1. Launch iTunes or any other iPhone device manager app, and go to Files.
Step 2. Drag and drop photos from Mac to folders in Files.
Step 3. On your iPhone, open up Files, and go to Browse > On My iPhone. This is where all the photos and documents in Files are stored: on your iPhone's internal storage.
Copy Mac photos to iOS Files App via iCloud:
Step 1. Visit iCloud.com and go to Files.
Step 2. Create a new folder or upload photos to existing folders.
Step 3. On your iPhone, go to Files app > Browse > iCloud Drive.
A photo with a cloud icon indicates that you can preview the thumbnail of that photo, the full resolution copy is stored in the iCloud server.
Final Words
Above methods may come into use in different situations. You can use the following quick guide to choose a best method base on your situation:
- If you prefer offline solution, use DearMob, iTunes, Finder, or any other desktop iPhone manager software.
- For wireless transfer, use AirDrop, iCloud, or a web-based iOS manager.
- To copy photos into iPhone internal storage other than photos app, use Files app that enables file-sharing feature.